Hello,
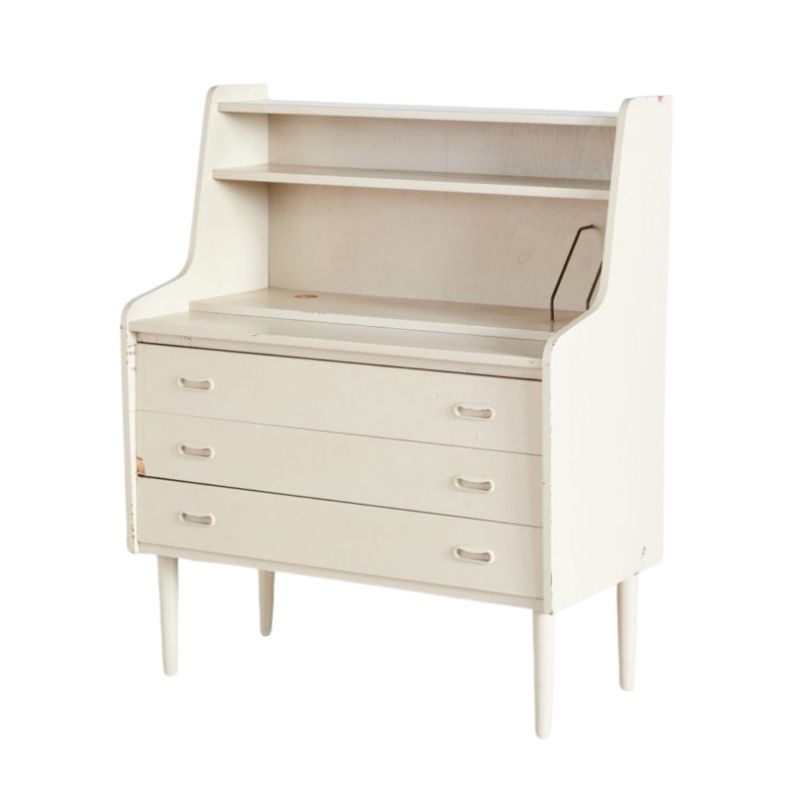
Found this in a barn, have no idea if it's a Knoll (if you do, please tell), but since I bought it for 10 euros... wasn't much of a risk!
But there is a "heavy" restoration (as you can see in the pictures) to be done.
Any ideas?
I see no way to disassemble it easily (screws, etc) so I guess it is -mainly- glued.
So far (only picked it up a couple hours ago) I see 2 - hypothetical - options:
- With patience, heat and some tools, I might be able to remove the side panel in a clean way, then change it by a new one, and find the 2 veneers that match (the interior face has 2 colors).
- remove the remaining exterior veneer, fill the gaps with some kind of filler (polyester mastic?), sand, then apply a new veneer
But all this are just guesses so far, so if anyone has experience with something similar, it would be highly appreciated 🙂
Thanks, and if anything is unclear please tell me, english is not my main language.


Hey Mark737,
Thanks a lot for the pictures, it does indeed look a lot like it (except the key lock), although I guess this credenza have been copied a lot. Have been looking on internet for more detailed drawings, or ways to identify it better, no luck so far.
Fingers crossed lol
Thanks!

This particular cabinet came in three models, 540, 541, and 542. It's hard to tell from the perspective of the photo, but it looks like yours might be the smaller 540 model, which was 36 inches wide. Mine was the 542 model at 48" wide. Here's a page from a Knoll reference book showing the 540 on the right and the 541 (72" wide) on the left. And you'll notice neither has a key lock, which was probably an optional feature.


@tktoo2, any ideas? A woodworker is needed.
"People buy a chair, and they don't really care who designed it." (Arne Jacobsen)
@mark737 : thank you for the picture! The dimensions match the 540 model, which can't be bad 😀
Now I need to take a better picture, and maybe someone in here could help me identify the wood type I need for the veneer change.
Thanks again!
Hmm. @tktoo2 seems to be on holiday. Hope, you have a good time. But when you’re back you should really look at this. I’m curious what you think.
"People buy a chair, and they don't really care who designed it." (Arne Jacobsen)
If the damaged side panel is not loose or coming off, you could do the repair as you described using a stable wood filler/putty to fill the broken/missing (press board/particle board?) substrate. It looks like Knoll used a continuous walnut veneer for the 2 sides and the top, replacing the walnut veneer is tricky, because any new walnut veneer you get will not exactly match the top so your best bet is to try to get a new veneer that closely matches the grain of the top and re-stain to match the (aged) walnut color of the existing. When you replace the veneer, you probably want to re-do the clear top coat of the entire piece. You will also need a new veneer piece for the damaged front edge. If you can remove the damaged walnut veneer, save that for future repairs or restoration. If you go this route, you don't need to replace the veneer inside the cabinet.
If you decide to remove and replace the damaged side entirely, it is good to have access to a fully equipped wood shop and you will definitely need a biscuit joiner tool (or a table saw) to replicate the butt miter joinery that Knoll did and replace the veneer on both sides of the panel to match the existing.
(Disclaimer: I am not a wood worker but just like to repair broken things that falls on my lap and bring them back as if no damage ever happened)

Thanks a lot for taking the time and giving me this detailed answer!
The side panel is not loose at all, which is why I was more interested in the first option... (lazy is my middle name :D)
So far I have removed the existing veneer, which did not come off easy, and only by small pieces (I've kept the largest ones to fix a couple little chips). I will try to start the wood filling this weekend. I know nothing about veneering (clear top coat?), so will read again carefully your answer later on 🙂
Thanks again!

The clear top coat refers to the finish but that’s the last step. You have to find matching veneer first. Then you have to glue it on, which is not particularly easy, because veneering requires high and even pressure across the whole surface. Hope, you have many clamps. You should watch a couple of YouTube tutorials first. Then you’d have to stain the new piece of veneer. I also recommend YouTube tutorials. And then there’s the finish. This can be lacquer or some other sort of varnish. What @minimoma means is that you won’t be able to match the new finish with the old one. Therefore you will probably have to refinish the whole piece, which means that you might to have to strip it first. It’s quite a project. But nice!
"People buy a chair, and they don't really care who designed it." (Arne Jacobsen)
From the first image you posted, the side of your cabinet looks like it had a matte clear lacquer finish and it looked it had some scratches/drag marks so I suggested re-coating the clear top coat and as Herringbone mentioned, you may have to strip the existing finish of the entire piece, re-stain (if necessary and it looks like it is needed) after doing all the sanding/prep work and after you have accomplished your main goal - to repair, re-veneer and replicate the damaged side to match the existing other side. I have seen some of this sideboard/credenza in teak veneer (yours is walnut) and I have not looked closely if the teak veneer versions have a matte hand rubbed oil finish (which do not need a clear lacquer top coat).
I've used contact cement in the past for applying veneer and used a roller to keep it flat and smooth. You will need some weights to keep the veneer as flat as possible. I've used sandbags (anything heavy you have will also work) over a slightly larger piece of plywood until the adhesive has cured and the veneer has bonded completely flat to the substrate.


If you need any help, please contact us at – info@designaddict.com