I think sanding it is your best option if the relief in the grain is undesirable. If you are uninitiated with a palm sander, then a sanding block is the way to go. 150 to 220 is the grit progression. Finish with a few courses of oiling (steelwool/sandpaper slurry)
I don't think you are going to make it worse by sanding it, as that is the whole point of sanding, take the higher parts down to meet the lower parts (as well as a polishing function of making scratches progressively smaller, until not visible). As with sanding any veneer, you need to be careful not to burn through, but if you are focused during sanding it is not difficult to avoid this.
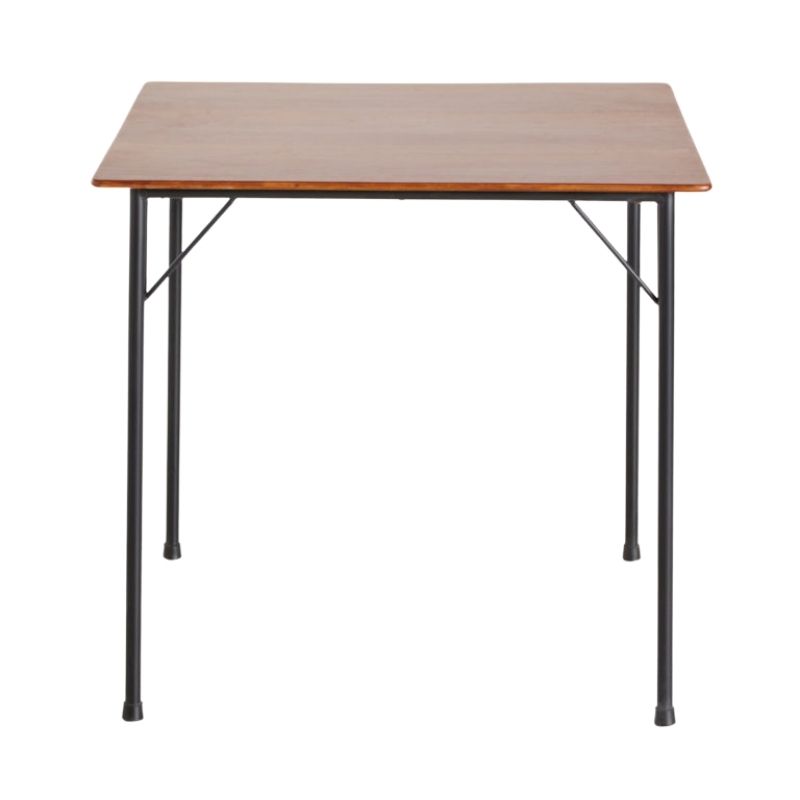
As to why it is in its current state, I believe this veneer is likely rotary cut, or early in a half-log flitch (the outer part of log). The majority of teak table veneers I have seen are either quarter-log flitch; and also plain or quarter sawn boards, which are then cut to veneer thickness. I could be wrong, as it is pretty hard to tell from the pictures, but what I can see (the first picture) has the characteristics of rotary cut or half-log flitch(limited cathedrals, more random grain patterning, wide sections of the rings that are not linear).
I agree with the above hypotheses, that the table finish was not well kept (not often oiled), and often exposed to moisture (not pooling but nightly wiping). Because rotary cuts have the most variation in the wood that is on the exposed surface (spring wood vs summer wood), they will shrink and swell much differently. I will avoid going into a discussion of xylum and lumen, but the springwood and summerwood have different densities and color (this is what causes the rings, and grain variation).
I would hypothesize that the substrate underneath is flat, so taking the high parts of the grain down to the lower parts, is not going to result in any quicker burn-throughs. Filling the grain with filler seems like it will be a mess, and not accomplish what you are trying to do. The lighter grain streaks are pretty wide, and from what I understand of grain fillers, they are meant for filling pores (think oak, mahogany, etc.), not wide height variations.
If you are going to try and fill the surface variation here, you need to sand and then use and oil/varnish mix (Watco, etc.) I suppose Starbright would eventually do it, but it is going to be even more work, on a process that is already going to be a fair amount of work. Pour a liberal amount on the surface, then sand vigorously with 180-grit (or finer if you are worried, but will take a lot longer). Once you have worked up a slurry, try to pack it into the low grain spots you are trying to fill. Let it dry overnight (or as long as necessary for it to start to set up. Then, repeat with a finer grit or steelwool. Repeat until you reach the intended smoothness. As Leif stated, the last application, when you are at the smoothness you desire, you can wipe across the grain as one final packing of slurry into the grain recess. If you want, you can keep getting finer grits, and eventually you will end up with what is basically a french polish (I dont recommend this though, not period correct, and takes a serious amount of elbow grease).
I almost like it as is, it has depth and character; just oil the hell out of it with steel wool (with varnish content). But if I were going to smooth this out, I would use a combination of what I discussed above. I would sand first (180 palm sander-220 by hand with block-maybe 320 by hand with block), and then use the oil slurry grain filling method described above (Watco teak oil with 220/320 and then 400, and maybe 0000 steel wool).
I am just finishing up my 11th table, and this is just my 2 cents based on these experiences.
To be clear, I was not suggesting grain filler to even the top. That would be a fiasco. I thought I was saying to sand it to flat, and then the large pores that teak has are going to open and those pores could use some grain filling.
Early teak pieces that are oiled or very thinly lacquered have much more open grain. Later in the mid 1960s and beyond the lacquer finish got thick and thicker, and quite frequently it becomes flat film finish filling in all the pores. So if the intention is to match that, then the grain will need to be filled. Otherwise the texture will just be all wrong.
@Zephyr thanks for your take on it. Yes, I think we can conclude that the current state is due to nightly wiping. From what I understand, this table belonged since new to a man in a city apartment where it was the only eating table so it probably did get wiped every night. He was obviously careful, because there's not a scratch on it although it did have quite a few localised stains which the cleaning and oxalic have dealt with very well.
The small dent in the edge shown in the picture is recent, from where it was strapped in transport and the blanket slipped away. This dent has come out quite nicely with steaming to re-swell the fibre, not perfect but much better.
The table came as part of a set with matching chairs, sideboard, dressing table. All the other items seemed to have had very little use, including the chairs. Even the original G-Plan labels and some notices were present. The aim is for these items to stay together as a set, so this table is letting the side down a bit.
I think a palm sander is the way to go rather than a block because I have a feeling that I'd be able to concentrate the sanding on the high/hard parts without always running over onto the softer areas to take a stroke, or running along existing ridges. But I am nervous about burning through though and knowing when to stop.
@leif Thanks, I had not quite understood that. Do you know if grain filler was ever used originally? I have sometimes wondered if the contrasting dark brown grain patterns you can see in a table's leaves but not on the a used or a restored top were not sometimes accentuated with coloured filler.
Not burning through veneer is almost entirely based on how closely you are paying attention to what you are doing. Sanding is obviously a pretty dull pursuit, so this is much more difficult than one might expect. Start with finer grit if you are really concerned. Also, attaching a vacuum (shop vac) to the dust output of your sander helps quite a bit, as it allows you see the wood better.
Keep the sander flat with even pressure. It is tempting to use the edge to focus you effort, but before long you will find yourself doing this all the time; it does not support producing flat surfaces, and it often promotes pigtails in your finish. This technique should always be used sparingly.
Unfortunately, one can never truly know how thick the veneer is; whether it was refinished at some point, or the fabricator had to sand deep to get edges to match.
Goodluck, and let us know how it turns out.
Hi Mark.
First off, you have a beautiful piece of furniture here. Lovely lines. Now your intent is to make the texture less "rustic', and I understand...as the leaves do look pretty tight. But I'd be concerned about not getting that "one area"..or 2..consistent with the rest of the top..and your eyeball would see nothing but that area..and miss out on the lovely design of the table. (By the way , I'm in therapy). You'd then have to shop for a fringed table runner in a simple holiday plaid.
So,
My 2 cents.
Lightly strip both the top and the leaves, and apply an Indian Ink finish (yes, black) to the grainy top and hopefully grainy leaves. Indian Ink looks its best when applied to wood with a slight texture..and the table would shed its rustic charm.
Leave the base alone.
Throw a dinner party.
Drink vodka.
Best,
Aunt Mark
ps I'm usually wrong.
The foam above the sand paper lets it conform to the surface below. You do not want it conforming. You want to enforce a flat surface. Use a sanding block. In fact use a full sheet of sand paper wrapped around a longer board. The sand paper will ride on the ridges. You may even be able to see exactly which stroke is perfectly done by when you finally just take the slightest bit off the valleys. And the remainder of the time the sand paper will pass right over the top of the valleys. You want exactly this.


If you need any help, please contact us at – info@designaddict.com