
I am making cushions for a high back Kofod-Larsen lounge chair with the one long Experspring on the back. One end fits into a hole at the bottom of the back frame and likewise with the other end at the top. The owner took it off so that the chair frame, which had had some horrible dark finish added by an amateur at some point, could be refinished. I cannot get the thing back on. Is there some trick to this? The spring is kinked a bit where it fit into the grooves so I know how much it has to be stretched (a lot), but it keeps popping out no matter what I do. I even tried C-clamping the bends into the grooves but it just slides through the groove. I see no evidence that it was anchored with a nail through the spring at each bend.I'm thinking they had specialized tools to do this when the chairs were made but surely it can be done somehow...?? I've replace Experspring loops with some effort but this is something else.Anyone have a clue?
How about making a pair of custom clamps to hold the spring while you stretch it.
I am thinking:
1. drill a hole in a piece of scrap pine
2. cut the scrap in half along the length of the hole
3. temporarily attach scraps to a pair of clamps
Thus you have a custom clamp that can grab the spring without marking it.
I feel your pain Spanky. I once re-did a Boomerang chair with new expersprings and my finger tips went through hell.
From the little experience I have, I found that the twisting of the spring was what contributed to it popping out, it is very difficult to pull and push the spring into the groove without twisting it up a bit.
You could try preempting this by twisting in the opposite direction so the spring settles down flat. I found this helped alot.
Leif, I had actually thought of doing something like that but I'd have to do it on every looped groove along one side of the chair back, I think. I think the key is get all those loops secured in place and then stretch the opposite ends into their grooves. I'm also not sure that the vinyl wouldn't slip around even a clamp like this. The tension on it is quite forceful.
H.Moon, thanks---i think this might be a bit different than the closed loops on the Boomerang chair. This is just one long length with one loose end stuck in a hole to anchor it and then the same at the other end after the spring zig-zags back and forth across the entire back.
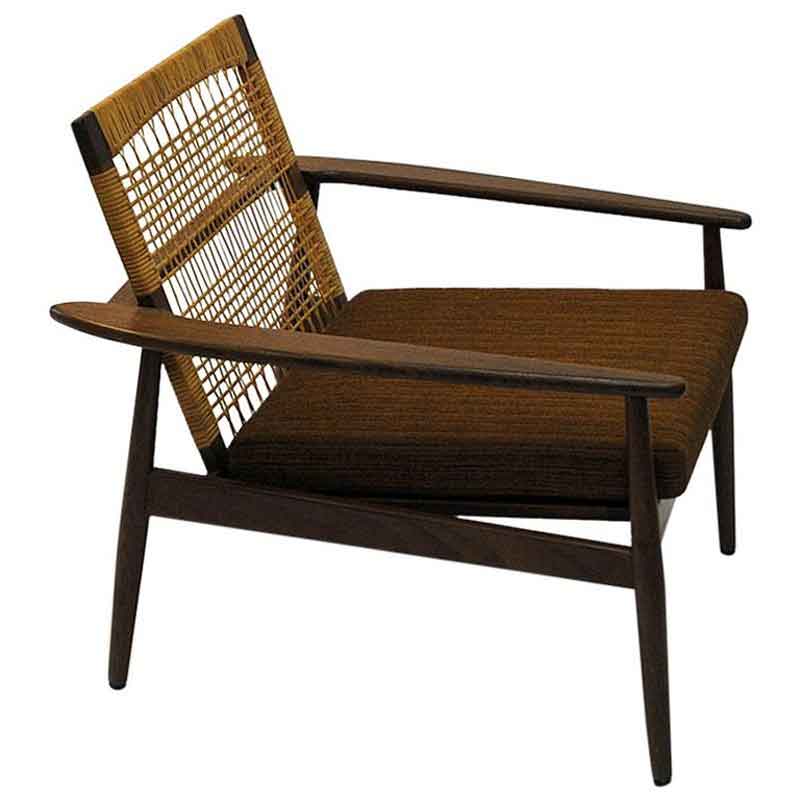
This page has a couple of photos showing this type of Experspring application. I've replaced the loop types but never the one long continuous spring.
https://furnishmevintage.com/livingroom/pair-of-mid-century-modern-kofod...
I finally figured it out. I noticed that the vinyl on the spring had a small hole at each curve where it fit into the grooves. I had checked the grooves for a corresponding hole but couldn't see any in any of the grooves, which I thought was weird.
I was going to put a length of 1/4" paper cord in instead and let the owner figure it out since he was the one to remove it. But then I gave it one last look today and finally spotted a teeny pinhole in each groove right in the crevice where the floor and wall met (so to speak).
So I got out a box of little brads and proceeded to tack the spring into the grooves all down one side of the chair back, then laboriously stretched the loops to the other side and maneuvered them into the grooves with much swearing and cursing. Then tacked those down. A few loops on the first side popped out again but eventually I got them all in. I think once they're in it's pretty stable, it's just getting them all in that's hard.
I'm pretty sure that the originals were installed with a custom stretcher that was a half cylinder in the shape of the groove (same curve, i mean--same radius). You would fit it into the groove and slant the top of the stretcher towards the chair center, slip the Experspring over it, then pull the stretcher back and slip the spring loop down over it into the groove. Et voila! No swearing necessary.
If I did these chairs regularly, I would get someone to fabricate this stretcher for me. I do not ever want to do one of these again with my bare hands.


If you need any help, please contact us at – info@designaddict.com