I come to you again with another question that has pestered me for some time.
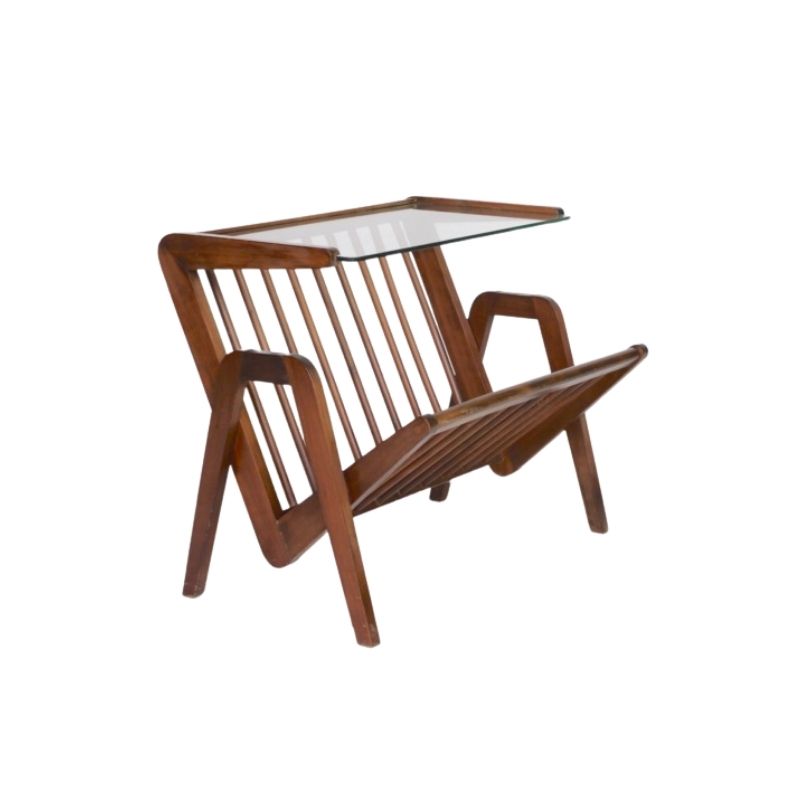
I have two of these floor lamps and one table lamp...all bought separately in Canada.
Also, somewhat preemtively, the lampshade in the first pic does not belong to this lamp...it was in a home stage and it was what I had and fit the color scheme...I get that it is wrong
I have seen them pop up online and most (in)famously on an expensive curated multi- dealer site where the table lamp set I saw was priced at (hmmm) many thousands of dollars (geez) and attributed to Denmark as per below...not sure how the dealer established that(hmmm)
"TITLE: Pair of Sculptural Danish Table Lamps
PRICE: $**** Purchase >
IN THE STYLE OF: george tanier (Retailer)
COUNTRY: Denmark
DATE OF MANUFACTURE: Circa 1960's
I have never seen any attributions or marks on any of the ther lamps I have seen over the years online.
dare I cast my line out there for thoughts?
Just curious about these pieces..I know they are not the holy grail or everyone's cup of tea 

This seller has had a few.
Teak floor lamps must be popular up in your neck of the woods as this seller seems to have had most every variation at one time or another. Give them a ring......Maybe they can shed some light.
http://www.thefabulousfind.ca/lighting
bupkis
thanks, I have seen their name come up in the searches over the years but did not call them. I will. They never put any details in the listings I saw so I possibly erroneously assumed they had none.
thanks..
so one thing I wondered was if george tenier was only a retailer or actually designed and/or manufactured goods as well.
Not that there is actually any substantiated link I can see there...someone thinks there is or is justifying the pricing by using Georges name over ...well bupkis
actually if you search that...
actually if you search that overpriced site the photo is captivating...they used a very thin band of a lampshade on the pair of table lamps allowing the 'scupltured teak' base to look pretty cool
however, I wondered if form slays function in this marriage since part of the purpose of a shade is to shield your eyes when sitting in a chair beneath the lamp and to hide the 'works' as well. Seems to me these shades would fail at that regardless of how killer they look.
I always wondered if the cone was the best shade for these...as you can see the huge shade on first pic is so top heavy...the tiny one on dibs is too small...they came with burlap cones so perhaps that was the original format and would be just right...too damaged to keep of course.

Last time I needed
to replicate a shade, I did it myself -- using an existing shade's hoops and spider.
Step 1: Trace the existing conical shade on a flat piece of kraft paper (for a pattern) or directly onto the desired new material, slightly oversized. Select a material to which white glue will stick; reasonably heavy paper of any kind, or stabilized fabric -- but not smooth plastic.
Step 2: Using painter's tape make a cone out of the cut material and place this "point down," so that the smaller ring can be placed at the smaller end of the cone, just above the work table. Check that the larger ring will sit nicely at the "top," then remove both rings and glue the seam of the shade precisely where it was taped together. When dry, place upside down again on the table.
Step 3: Replace the smaller ring at the small end of the cone and run a bead of white glue (from a small-size dispenser bottle) into the trough created by the wire. If necessary use a narrow stick or a fingertip to spread the glue bead into the groove; use as little glue as possible to avoid visible smears. A perfectly consistent bead will produce the best effect. Allow to set.
Step 4: Repeat Step 3 at the "top" with the larger hoop. When thoroughly dry, trim excess material with a very sharp knife, or with scissors. If desired, tape or ribbon trim can be added, though a well-glued and neatly trimmed shade may need no further adornment or structure.
I sprayed my paper shade with matte clear lacquer to enhance cleaning and longevity. My customer was pleased as she couldn't find a ready-made shade of this shape; the old shade was torn is several places.


If you need any help, please contact us at – info@designaddict.com