This dealer in London special...
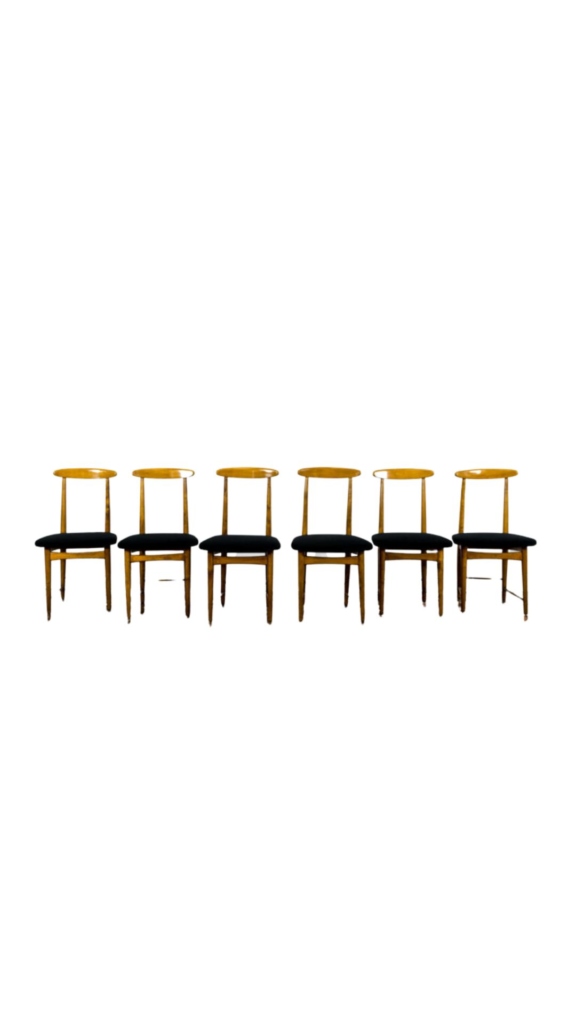
This dealer in London specializes in Danish dining chairs, and shows quite a few images of chairs with blue cord and yellow cord, which are cited as original. I have never seen any of these in the U.S., only natural colored cord.
http://www.paeredansk.com/dinChairs.htm
I kind of like the yellow...
I kind of like the yellow cord. Not so sure about the blue, but that's probably because it looks like the ubiquitous slate blue that has been so popular in US decorating since the 80s, often paired with mauve. Yech.
I want some black cord! I ordered stuff from Frank's Cane Supply recently and Frank himself called to confirm the order, which was nice. But only later did I realize I could have asked if they could maybe get some! I guess I can always email or call.
Flat pleated cord
The coloured cord is original and was used in various colours.
Green, yellow, blue, grey and black.
I have a set of 6 which I am trying to find the flat cord for but the Danish maker of it burnt to the groung 8 years ago.
So been hoping to find an indian maker of shoe laces but so far no joy.
ANy suggestions
Wow!
I just bought a set of 6 Moller chairs (2 arm chairs; 4 side chairs) that need some TLC. I have to do some sturctural repairs first, re-oil the teak and then paper cording. I have a history of carpentry, but the paper cording was what made me nervous (seemed too monotonous for me). But after reading this thread and doing other research, I'm looking forward to the project!
Matthew Paul
A question about CH23s
I've got a quick question about doing the weaving on some Wegner CH23 chairs.
I've finished the front to back strands and the front/back wrapping of the rail, now I've come to the side to side weave. I looked at tchp's instructions on the Mollers, but it's a little different with the extra side rail on the Wegner chairs.
I have one chair to look at for reference, and I see that the weave was started on the front left, with a loop tacked down (as opposed to a single strand).
My question is basically this: Do I need to cut a long length of cord, find the middle + tack it down, then proceed to weave pulling the 200 feet (or whatever amount of cord needed - haven't calculated yet) through all the strands/side rails each time I start a new weave? That's the only way I can imagine in my mind right now, but that seems like it would be awfully rough on the paper cord, rubbing up against the front/back strands and side rails over and over.
Does anyone have any tips to get me started on the right track? Spanky, I saw in this thread you did a beautiful set - any help would be greatly appreciated.
Thanks!

Hey, bubs
Can you get hold of a "The Caner's Handbook" by Bruce W. Miller? Check your library. It has instructions and photos for exactly this kind of weaving.
I can try to walk you through it, though. I mean, it's easy enough to write it out but if you're like me, it's far easier to understand through photos than through words.
Here goes:
First, you should have an odd number of warp strands (the front to back ones).
Pull off about a 50' strand of cord and tack both ends to the inside of the lefthand rail. (I think they mean the lower rail.) Then find the middle of the cord and weave with this loop end.
Pull this weaver loop under and up the outside of the left rails. Bring it up over the top of the rails and begin weaving, going first OVER the pair of double warp strands (four individual strands in all) on the left, then doing under/over across.
On the right side, bring the loop down the outside of BOTH side rails.
Then thread it between the rails from behind.
Then bring it down the outside again, then thread it to the back of the rail and bring it out between the two rails again but this time bring it up and start weaving back across the seat again.
Make SURE you don't twist the strands, and be sure to keep them tight and smooth and pushed as far back to the back post as possible. A spring clamp might help until you get the hang of it. Or until the cord gets caught on it one too many times and you get hoarse from cussing.
Hope this helps! Let me know if you have more questions.
Oh, also...
...I see you weren't really asking how to weave the sides. Oh well!
But yeah, you have to weave with about a 50' length. I think I used more like 60' just so i wouldn't have to tack so many new ends down as I went. What a pain that is---to do it neatly, I mean. I have since acquired a pneumatic stapler so will try that on the next chair that I do.
The photo I posted above is of someone else's chairs. You can see a couple of mine on my blog (link below).
http://www.modernchairrestoration.com/2011/07/hans-wegner-ch23-chairs/
Thanks!
Thanks for the info spanky, much appreciated! I just wasn't sure if there was a way to weave it directly attached to the coil of rope and not pulling around 50+' of cord, but you answered that for me.
I guess it's not uncommon to have to tack a new piece of cord down half way through, or is it preferential to have all the side to side weaves done with one continuous strand?
Also one last question, I promise! Is there any reason you start at the back of the chair as opposed to the front? The reason I ask is that the second chair I have (which isn't in dire need of re-cording) appears to have been started at the front.
Again thank you so much for the help. The library is out of The Caner's Handbook of course, and I'm just itching to get this done so this thread has been a lot of help. Also I checked out your blog the other day when I was searching. You did a beautiful job!
bubs
For the two-side-rail chairs, you can't pull your weaving cord off the coil because you have to pull it all the way through the side rails rather than just looping it around an L-nail on the underside. You need a finite length for that side rail wrapping. The trick is to get good at keeping the whole length from getting tangled so that you can work with a little bit longer length than they recommend and thus have fewer tacked ends underneath. I think I had three in all. Maybe two.
When I first started out on these chairs, I spent a LOT of time untangling cord. Like, more time untangling than weaving.
You can start at the front or the back of the chair. I like to start at the back because it's tough to fit the last few rows in and it's just easier not to be reaching across the seat to do it. That's all. Otherwise it doesn't make much difference.
The other thing you need to be careful of is keeping the wraps on the side rails as tightly packed as possible. Push them with the dull edge of a butter knife, or something like that. Just be careful not to let it slip and gouge the cord (or your fingers).
finished product
Managed to get it done yesterday and I'm pretty happy with how it turned out. I ended up using three pieces of cut cord to do the side to side weaves - next time I'll try and do it with less, and yeah the tangling was just a pain. Also those last few weaves sure do get tight!
Thanks again for the help!

If you need any help, please contact us at – info@designaddict.com