
Manual staplers and most (all?) electric staple guns use heavier gauge staples and do not have enough power to drive the staple all the way into hardwoods. They are ok for pine but the larger gauge staple will tend to split the wood if you're not careful. I don't recommend them, and that's after a lot of effort on my part to make them work.
A pneumatic staple gun and compressor are best---fastest, easiest to use, and they do an excellent job of anchoring upholstery materials and the staples are smaller gauge so you don't have to worry about splitting the wood. The compressor shoots them in all the way but you can also do temporary tacks by holding the stapler head tilted to the side so that only one leg of the staple goes all the way in. Pull it out later with diagonal pliers.
If you don't want to invest in a compressor and staple gun (I think at least $200, maybe $250) and can't borrow someone else's, consider using upholstery tacks. They are super cheap and you can get a new magnetic tack hammer for about $6 at most hardware stores. Do look for good quality blued steel cut tacks, though. The last ones I got (from Ace Hardware, I think) looked like they had some kind of black coating on them and the points on many were squared off which of course made them tough to drive into the materials.
It will take some practice to get good at hammering tacks in accurately at a pace that isn't painfully slow, but they're so cheap....still, when I finally broke down and got a compressor and stapler and was suddenly working 3-4 times faster than I ever did with tacks, I kicked myself for not doing it years earlier.
Ohh! I was also going to ask about foam. I went to an upholstery place the other day and was quoted $50 a chair in foam. I've never bought foam but that seemed high to me so I wasn't giving this place any money. I was advised to check out this place http://www.sureline.ca/ instead. This place will have all sorts of foam with a wide price range I'm sure. I know I need 1 inch for the seats and 1/2 inch for the backs with the seats density being more important than the backs. Are there types of foam that work best/I should stay away from?
There are only two kinds of foam used in upholstery: latex and urethane. Latex costs a lot more and is not used much these days, I guess because of the cost. It's more comfortable and lasts longer than urethane but a high quality urethane is a good substitute. Buch chairs used urethane foam originally so you're fine there.
The place you linked to appears to be a wholesaler so you would have to place a minimum order. The place I get mine from---and they do not do mail order, unfortunately---charges about $22 at the moment for 1"x24"x108" extra firm density urethane foam and about half that for the same size piece in 1/2" thickness...so yes, $50 per chair is high! Unless that was for latex.
You should be able to find some deals on Ebay, though.
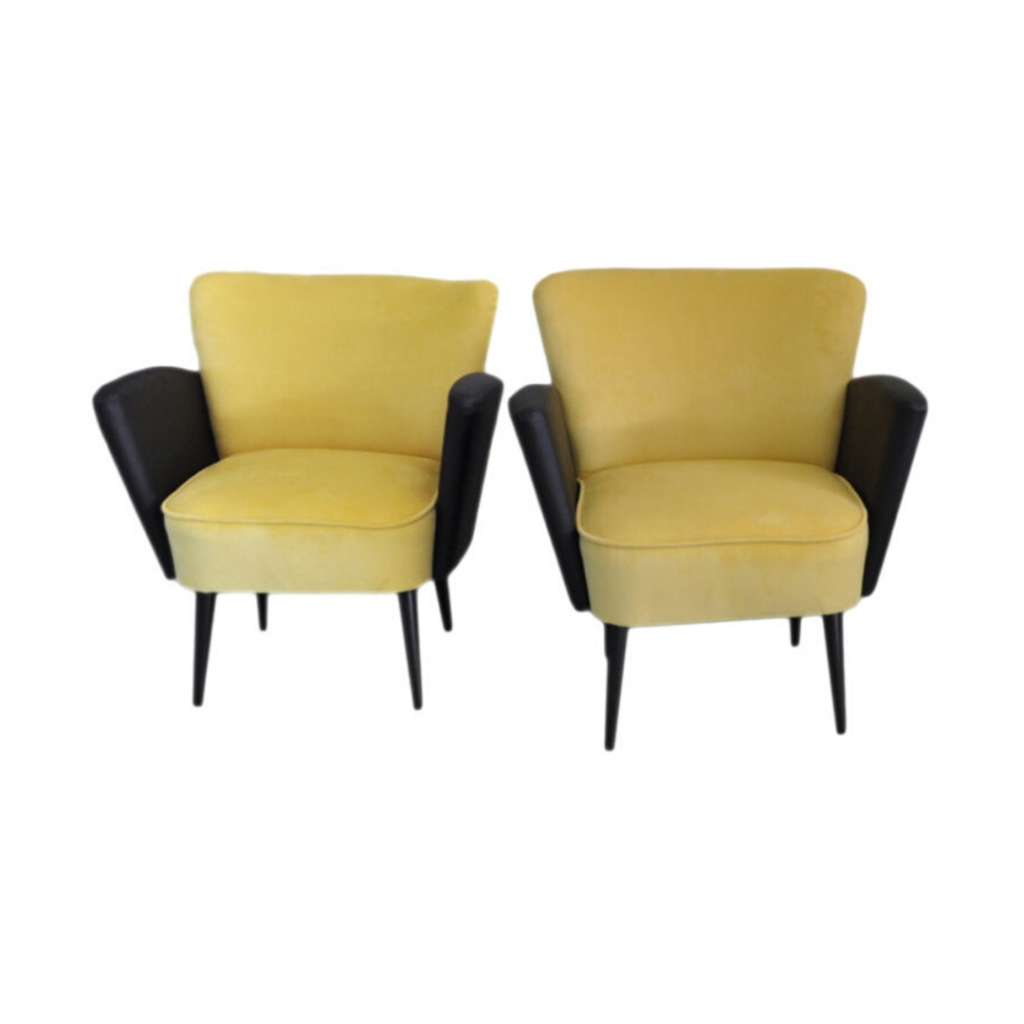
After pulling all the staples and buying the fabric (Kvadrat Tonica 192) and foam, I made the decision to have four chairs upholstered by someone. I do plan on giving the other four shot sooner or later but I wasn't prepared to purchase a pneumatic stapler and air compressor. I should be able to find something second hand at some point but just wasn't happening. Anyways here are a couple shots of the chairs : )
We went with a conservative colour on these four chairs as it was all that was really available but plan on matching them with something funky like http://kvadrat.dk/collection/detail/uid/2953-0411 if we can get our hands on it.
Thanks again for all the help and suggestions! I am sure when I do make an attempt I will be back asking questions!


Excellent fabric choice! I really like the greenish-gold of the other one, too. I think it might go better with walnut than teak but that's just my preference.
It looks like the upholsterer cut the seat foam to exactly the size of the wood base. I would worry a bit about the fabric wearing out prematurely at the front edge of the seat because there's not much, if any, foam between it and the wood.
The way to get around this---for future reference---is to cut the foam about 3/4" bigger than the seat on all sides (so 1.5" longer and 1.5" wider), then undercut it with a razor blade held at an angle. I'll include a quick sketch here.
When you pull the fabric around to the underside of the seat, it will smooth the foam over the edge of the plywood and you'll get a lovely rounded edge all around. This will also pad the wood a bit which helps the fabric to wear longer. Adequate padding on the frame at points of wear is always an important thing to consider.
Knowing that the foam was done improperly is so frustrating! When I took off the old upholstery I was wondering why there was foam (pretty much dust at this point) stuck to the edges of the wood base, I see now that it was probably that extra foam you're talking about Spanky. It will drive me nuts if 4 chairs are done one way and 4 another. Seems like a waste of fabric to redo these ones but it may come to that at some point. For now I'll just have to let it go : )
It's not the worst thing in the world, and when they're tucked under the table or when you're sitting on them you won't be able to see it! I've lived with worse. It's amazing how quickly and completely you forget about something like that once a little time has passed.
Maybe this story will make you feel better. Years ago when I was still kind of new to upholstering, I got a great 60s sofa to redo for myself. At that time it was still pretty hard to find really good quality MCM fabrics at a discount and I could not afford to pay full price. I settled for a neutral chenille in the local fabric store. Mistake #1.
I didn't have a pneumatic stapler and compressor at the time and was still using tacks and a tack hammer---which, nothing wrong with that but it does add a LOT of time. I decided to take some other shortcuts to make up for it, one of which was not doing boxing or welt on the cushions. Mistake #2.
I also restyled the arms because they had a very contrived look---which turned out ok but I overpadded them a bit and they just looked sloppy, or something. Mistake #3.
The chenille turned out to be cheap quality, I think mostly polyester, which started feeling rough and icky after awhile. Also, I got sick of the color pretty quick (a tweedy brown...sort of). But I couldn't face redoing it so soon after dealing with all that tacking, not to mention the time it takes to strip down an entire sofa frame, so I gave it to a friend to use in his music studio. Good riddance.
Fast forward about ten years, past a few other reupholstered vintage sofas, all of them done better than that first one but none of them quite as comfortable. My friend said he was gonna get rid of the sofa and asked if i wanted it back---i said YES! Because by then the upholstery was 15 years old which is a reasonable time to redo it anyway!
I got some beautiful wool fabric by Sina Pearson and reupholstered it the right way, including the arms, and with welted box cushions, and I love it and am sitting on it right now. The end.
Haha, thanks for sharing Spanky! The chairs look great and you're right, I will forget about it as time goes on and I enjoy the chairs with out the extra 3/4 inches of foam.
I love that you ended up getting the couch back after 15 years and got another crack at it! It must have felt really great to see/enjoy the couch as you had initially planned. Do you have any before and after pictures?
I do have photos though not very good ones! The original one was taken with an early digital camera that was pretty low resolution, and the second one--new camera-- was not a lot better. I can make out the arm detail though---it truly makes me shudder. What was I thinking?!
The final one was taken when the sofa was at my daughter's house, which is where I did the work on it because she had a lot more space. (They're gonna replace the green carpeting eventually, thank god.) I restyled the back to make it just a regular boxy shape, and then added button tufting. The arms started with that weird welt going down the center; now they're just flat and smooth on top.
The fabric is a thin, tightly woven wool in a vintage gold color that I love but I think doesn't appeal to the masses in general. So far it's wearing really well and I hope to get a good many more years' worth of use out of it because I do NOT want to redo this thing again anything soon!


@spanky - a cry for help. 😉
"People buy a chair, and they don't really care who designed it." (Arne Jacobsen)
Thanks for the bat signal, Herringbone.
Rachel--I have never redone these chairs in vinyl. I believe the originals were glued together. I've never seen Curv-Ease used on them (there's also another name for that stuff but i can't remember it now).
The back fabric (or leather, or vinyl) goes over chipboard cut to fit exactly inside the welt---which you probably found when you stripped the old upholstery off. If it wasn't there, then someone else removed it.
The excess fabric at the corners should be trimmed at closely to the staples as possible. I usually use a safety razor to do this. I also redo these in wool and often end up steaming the remaining bunched fabric as flat as I can so that the finished back looks as flat as possible. Obviously you can't do that with vinyl, though.
I tried gluing the backs on when I redid chairs like this for the first time. I used contact cement and it was really hard to keep it from getting where I didn't want it to go, because it's so goopy. Then i had to clamp it in place because simply pressing the two parts together wasn't enough---and then the clamps left dents in the foam on the fronts! Finally i got the backs to stick but a few years laster some of them started to lift up.
So then I switched to hand stitching the outer backs in place just along the edge. This is way easier if you are very careful to avoid getting spray adhesive in the stitching zone (i mean the spray adhesive used to glue the edges of the fabric onto the chipboard).
You could probably hand stitch the backs onto your chairs but you should probably test how well the vinyl holds up to that type of stitching. I would worry that it might tear the vinyl when the thread is pulled tight. You would also probably have get the thread tension just right to minimize puckering---and get the stitches the same distance apart.
Sorry to not have a simple answer. This is just my experience and what works best for me. I also do most chairs for people who pay me to do them, and I want to be sure the work stands up over time.


If you need any help, please contact us at – info@designaddict.com