Hi everyone,
A short while back I posted a question about a Kjaerholm stool, being authentic
considering it didn't feature a center button.
I bought the stool judging from a poor photo, on a secondhand site, from a neighboring
country. It was described as 'nice leather ottoman' and that was it. Price was in within two numbers..
Got no answers on my questions, but closing the deal went ok and vendor was willing
to send it by post.
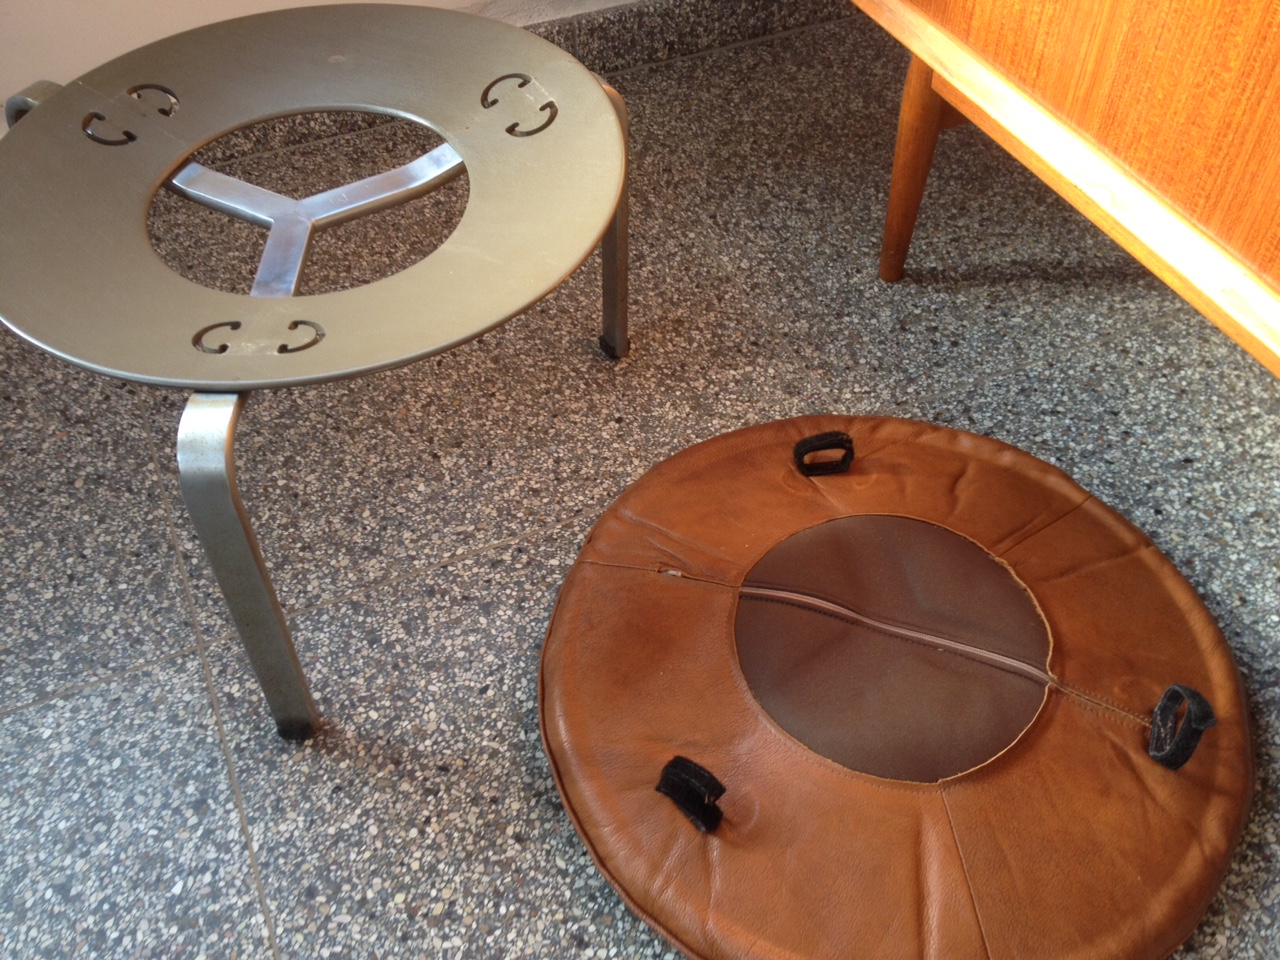
This weekend I received the package, removed the pillow and discovered the embossed mark.
Hooray! 🙂
It misses it's rubbers, I assume the pillow was renewed as it features velcro straps and is missing the button.
But the cushion is well-done, with respect to the original and in quality leather (it seems to have some age itself).
The laminated seat below shows some cracking. As I am weary this would evolve in a lesser state, what would be the best way to reinforce this, without harming it's value?
(I was contemplating wrapping the underside in a thin layer of fiberglass and refinish in original color).
Thanks for your insights!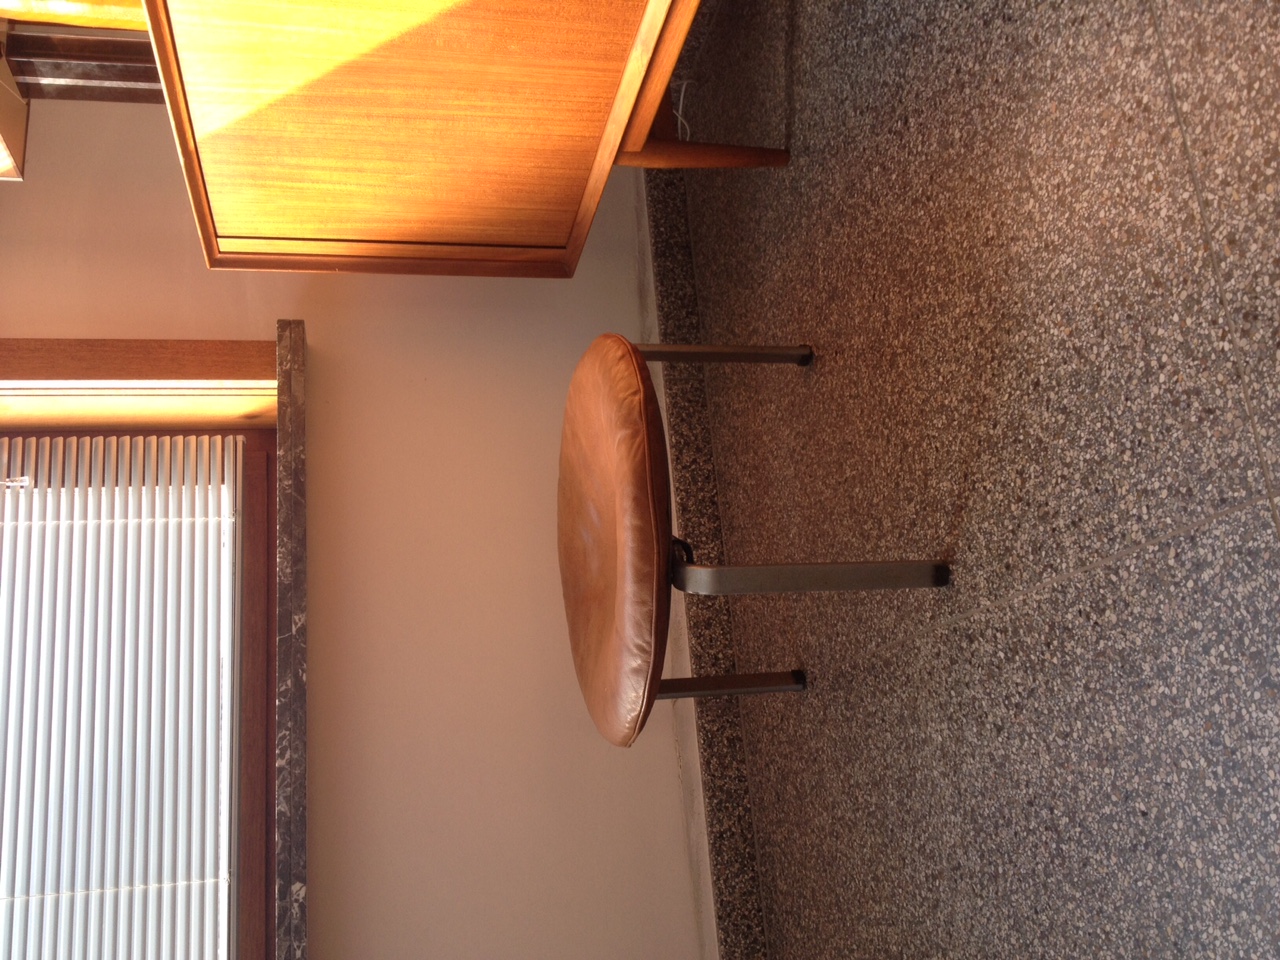
 <img class="wpforoimg" src=" http://d1t1u890k7d3ys.cloudfront.net/cdn/farfuture/HmGzirT1q_9KXv58LXrvOX
Cracked molded-plywood panels are among the most technically challenging and difficult of all repairs. In almost all cases, an "invisible" restoration is simply not possible without re-veneering at least one face of the lamination. Often, with regard to vintage production furniture, replacement of the damaged panel is the cost-effective option when historical accuracy is the goal. Unfortunately, any intrinsic historic value your stool may have had in the collector market is already lost as I imagine the purchase price reflects.
That said, I think glassing *both* sides of the panel, if neatly done, is a reasonable approach to restoring structural integrity.
Cracked plywood or not, an EKC Kjaerholm for under a hundo euros (I assume that's what "within two numbers" means) is an excellent pickup. Since the mark is not easily interpreted like a Fritz Hansen label, EKC listings have a better chance of slipping under the radar. I am constantly on the lookout for those.
One of the reasons you did not get any responses to the first post was due to the photos not being accessible to view, at least for me. I checked the post a few times from different mediums and never saw any images.
You have the perfect template to trace out a new seat 100% identical in every way. You just need to find identical plywood. It is probably quality birch, but a little light sanding will reveal the species and number of plies.
The inside and outside cuts can be made with a jigsaw, and the edges are eased with a sander. The cushion attachment points are made with a plunge router. You might even be able to use the existing frame as a jig for the router cuts.
Take the frame to a paint store and get the color matched and grey oil paint and penetrate to ensure you can brush it on very smoothly. Or take the paint to someone with a sprayer.
And keep the old seat frame as proof of the perfection of the new one.
I have the utmost respect for a perfectly made replacement part. There is nothing magical about the original, except that it is exactly as it should be. Povl Kj
Hi guys & girls,
Thanks for your comments. Indeed tktoo, I'll need to adjust my initial enthusiasm 🙂
The laminated piece isn't cracked through, but is structurally questionable.
And Leif, it is indeed conical in shape.
Judging it's construction I would assume I am not the only one facing this problem: the crossing of the layers are quite short, making the connections within the laminations also quite weak.
Making a conical laminated piece and routering it out like this (on a non-flat surface),
is going a bit far for me, I think..
I paid in the region of 90 dollars, including shipping.
I don't think that making a conical piece is actually going to be very hard. The concept is simple: cut C shaped half circles that are taller than they need to be and squeeze that extra height so it bends into a cone. Then laminate a bunch of these together clamped onto a form. And you have the perfect form already. You will need a bunch of clamps.
You could do the math to figure out just how much taller the C halves need to be, or you could get some thick paper, cut it roughly to shape, hold it against the form, mark the edges, and then cut it out. If you leave the beginnings and ends a bit long, create a duplicate. then put them on the form so the beginnings and ends overlap, you could then lay a ruler over the overlap area and cut both layers of passer with a razor. This will get you the perfect angle for where they meet.
You would want to build up the whole frame from a minimum of 4 layers of plywood. Fortunately birch plywood is available in just about every thickness imaginable. It is used for hobbies, so very high quality pieces can be purchased that are very thin.
Cut out all the pieces with a jigsaw. Dry fit them, check in your clamping set up. Then glue it all up with yellow PVA wood glue.
This is actually still pretty simple.
It's an elegant and ingenious little stool for sure, bj. And certainly a bargain at that price.
It seems reasonable to me that it could have been anticipated that, at some point, someone of above average substance might misuse a short stool like this as a step. So, I guess, if there is a design failure here, it's in not making the plywood element sturdier.
If, as you say, the damage is limited to separation of the upper face veneer and the underlying plies seem sound, overlaying a fiberglass patch to only the damaged side would probably suffice. Of course, an adequate overlapping area is necessary as is a surface prepared to bare wood. I'd probably want to use two layers of medium/light-weight cloth with the weave laid at a 45-degree angle to one another and then drill/saw/file/sand the cutout after the resin has cured. Be sure to use an appropriate solvent to remove amine byproducts from cured epoxy before painting.
Nice find and good luck!
If you need any help, please contact us at – info@designaddict.com


