Design Addict

Cart

Moller 75 Repairs
 

Moller 75 Repairs  

Page 2 / 4
  RSS

frankielemmons
(@frankielemmons)
Prominent Member
Joined: 7 years ago
Posts: 157
26/10/2018 6:12 pm  

Thanks for the advice. When knocking this apart, should I leave the two rear legs, the rear stretcher and the back rest intact? Seems like I couldn't knock the rear stretched out from the legs without removing the back.

Similarly, should I leave the front stretcher attached to the two front legs?

And, to clarify, I should aim to remove all of the old glue, right?


ReplyQuote
leif ericson - Zephyr Renner
(@leif-ericson)
Illustrious Member
Joined: 14 years ago
Posts: 5660
26/10/2018 11:38 pm  

I have never disassembled the rear leg backrest assembly on a M


ReplyQuote
frankielemmons
(@frankielemmons)
Prominent Member
Joined: 7 years ago
Posts: 157
27/10/2018 5:39 am  

It look a long time, but after a lot of knocking and some heat I got the loose components apart. I'm currently trying to scrape all of the old glue off of the components, but wanted to check in about one thing. It seems like the movement in the one joint was this small break in the joint (photos). Can I just leave it as is and glue it back up? Or do I need to remove the broken chunk from between the dowels and glue it back it its place first?


ReplyQuote
leif ericson - Zephyr Renner
(@leif-ericson)
Illustrious Member
Joined: 14 years ago
Posts: 5660
27/10/2018 6:23 am  

That small chunk is not the cause of the looseness, and it will get crammed back in there when you re-glue. It happens all the time with M


ReplyQuote
frankielemmons
(@frankielemmons)
Prominent Member
Joined: 7 years ago
Posts: 157
30/10/2018 2:47 pm  

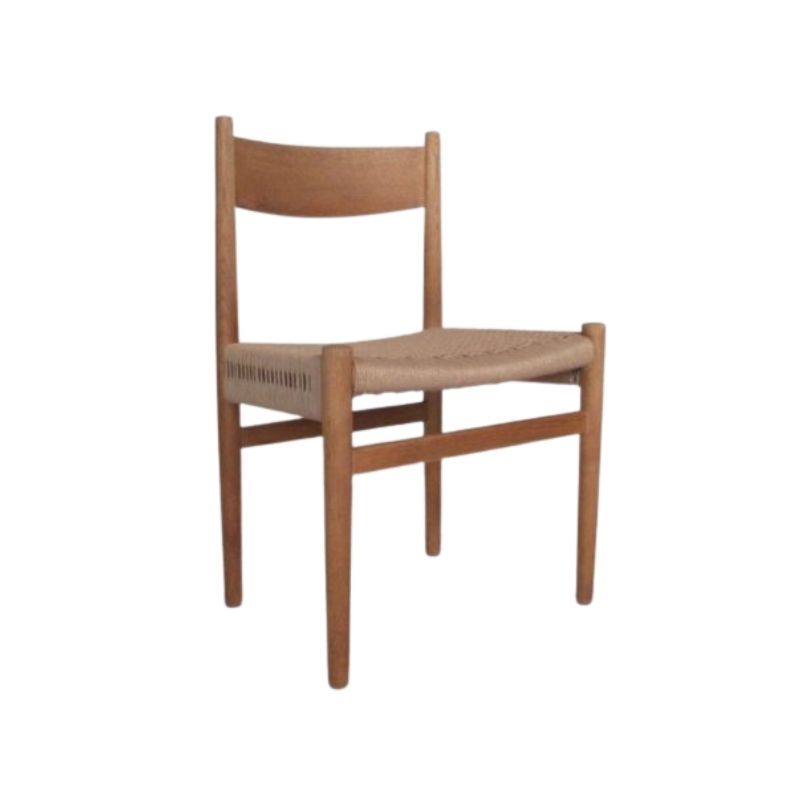
I got this all glued up and its seems to be rock solid now. I was excited to finish this up and did the seat in one sitting - not my best idea. I was also thinking that, having only woven a Bramin/Klein chair in Danish cord that this was going to be far easier. Of course, that wasn't the case and, while I did finish, it's not completely right.

The issue I have is that I don't think my warp strands were taught enough. So on the front and back rails some of the warp strands are lifting off of the rail and it doesn't look as sleek as these chairs do when done properly. The whole seat is "tenting" a bit and doesn't follow the curve of the front and back rails. My question is how tight should the warp stands be pulled? The reason I left them "loose" was because of the placement of my nails - it seems like they needed some play so that the warp strands would all run parallel, but I guess that isn't really the case.


ReplyQuote
Spanky
(@spanky)
Illustrious Member
Joined: 6 years ago
Posts: 4376
30/10/2018 3:50 pm  

The warp strands don't need to be super taut, they just shouldn't sag. They should also all have about the same degree of tension, or at least as close as you can get it. I usually have a couple of strands that look looser. I check them as I go and if one ends up too saggy, i go back and fix it immediately.

I suspect that you could have crammed another row or two of weft in there. Can you post a photo? Maybe two---one from an angle in front, and one from overhead?


ReplyQuote
frankielemmons
(@frankielemmons)
Prominent Member
Joined: 7 years ago
Posts: 157
30/10/2018 4:34 pm  

If I need another row or two of weft this whole undertaking might not be for me! I really jammed in the last pair.


ReplyQuote
Spanky
(@spanky)
Illustrious Member
Joined: 6 years ago
Posts: 4376
30/10/2018 5:09 pm  

You


ReplyQuote
Spanky
(@spanky)
Illustrious Member
Joined: 6 years ago
Posts: 4376
30/10/2018 5:11 pm  

Sorry, meant to say you could leave it and just NOT look at it!


ReplyQuote
frankielemmons
(@frankielemmons)
Prominent Member
Joined: 7 years ago
Posts: 157
30/10/2018 5:36 pm  

Thanks spanky. I think I'll take your advice and wait a bit, tend to the other project I have working and try not to look at it. Then eventually redo it.


ReplyQuote
frankielemmons
(@frankielemmons)
Prominent Member
Joined: 7 years ago
Posts: 157
15/10/2019 5:49 pm  

Nearly a year to the day later, I've finished the 75 that was in the most disrepair. Thanks to Leif's replacement back I got this chair pretty close to original - obviously, my skills aren't even close to the craftspeople at JL Mollers. Lots of chiseling, drilling, rasping, sanding, gluing and weaving.

1571154587-image3.jpeg

ReplyQuote
frankielemmons
(@frankielemmons)
Prominent Member
Joined: 7 years ago
Posts: 157
15/10/2019 5:51 pm  

Assembled, not oiled.

1571154664-image2.jpeg

ReplyQuote
frankielemmons
(@frankielemmons)
Prominent Member
Joined: 7 years ago
Posts: 157
15/10/2019 5:51 pm  

Completed.

1571154704-image1.jpeg

Browkin liked
ReplyQuote
tktoo2
(@tktoo2)
Illustrious Member
Joined: 6 years ago
Posts: 745
16/10/2019 2:00 pm  

Sculpted joinery is tricky enough but doubly so when one half is already worked to finished dimensions. Nicely done!


ReplyQuote
Herringbone
(@herringbone)
Illustrious Member Moderator
Joined: 2026 years ago
Posts: 1195
20/10/2019 12:46 am  

Hey, very nice!  I’m impressed. That’s a project you’ll remember even years later. But did you stain the wood or did it really come out that dark  when you put on the oil?

"People buy a chair, and they don't really care who designed it." (Arne Jacobsen)


ReplyQuote
Page 2 / 4
Share:

If you need any help, please contact us at – info@designaddict.com

  
Working

Please Login or Register