Hi everyone!
I did look around but couldn't find an answer, so here I am !
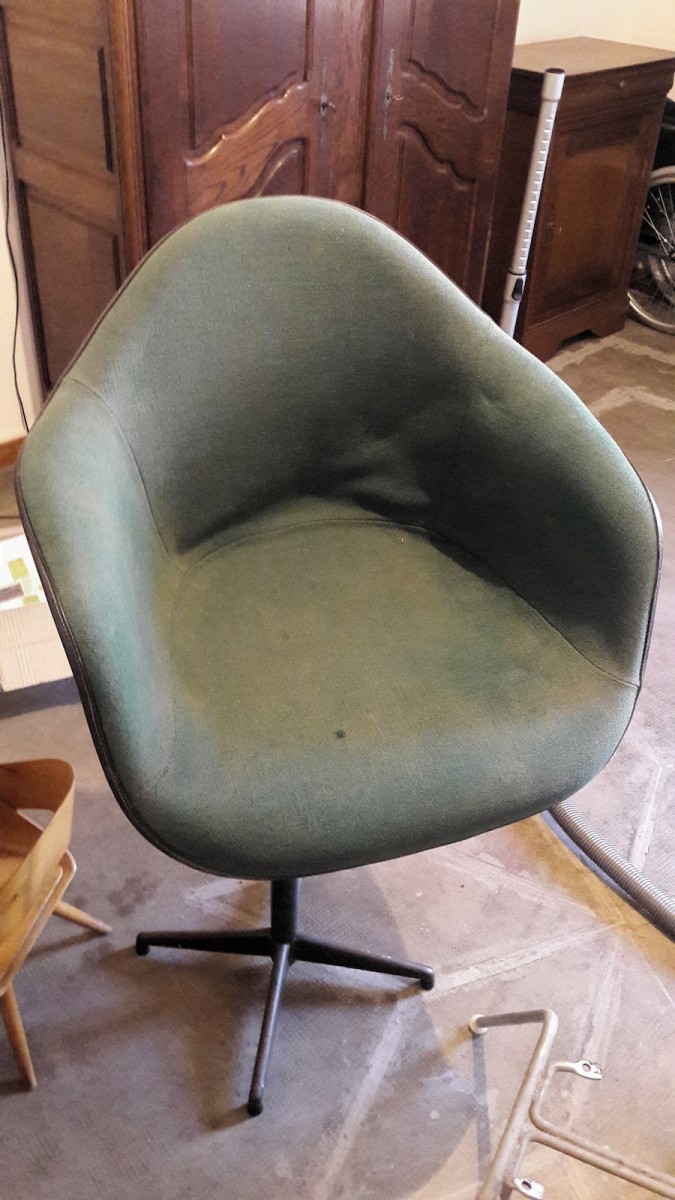
I purchased the picture-attached armchair (shell is just placed on a stool for the pic), and I am wondering if it's possible to re-glue the fabric? That is, if I am correct assuming that the fabric was originally glued to the foam, lol.... newby here 🙂
If yes, how would you suggest I do this?
Thanks for your advices !!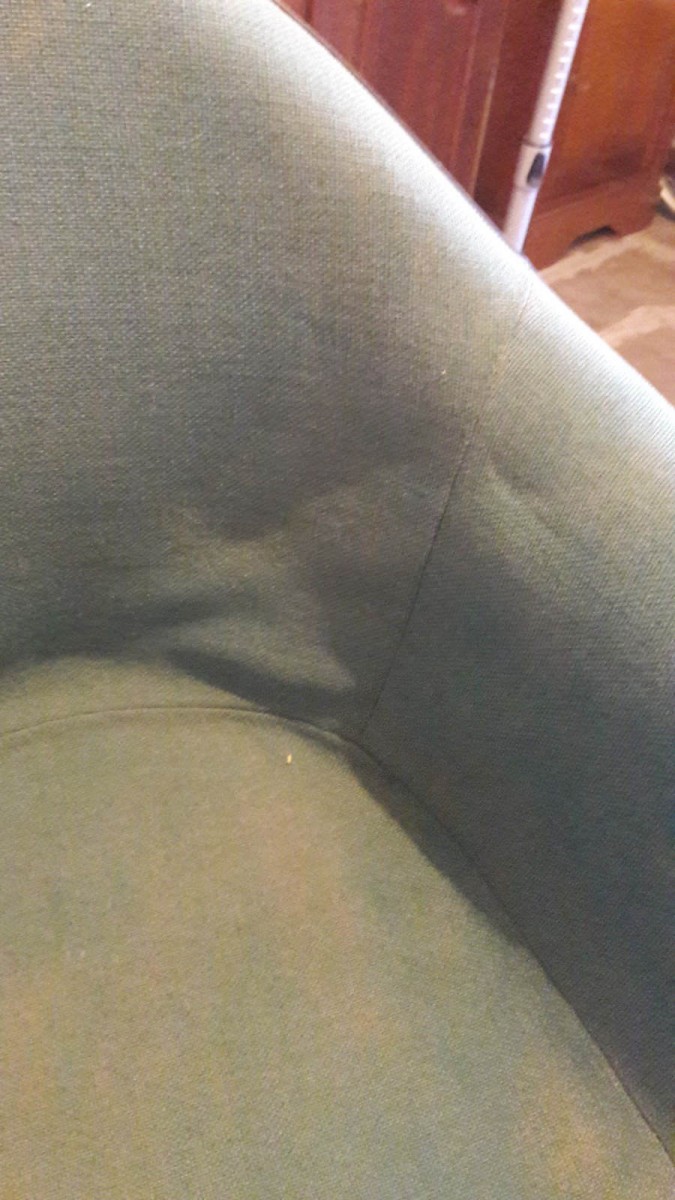
I don't know of any way to do that short of pealing back the fabric from the perimeter and spraying fresh adhesive on the foam and the back of the fabric, then smoothing it into place. That's not even worth doing if the original foam is dried out and crunchy, though, as is the case in a lot of these chairs.
Hey Spanky,
Thank you for your help!
I was hoping someone had found some kind of seringue injectable glu or something :/
Concerning the foam it's not in a bad shape (imho), but the chair is "not that old" (82).
Also, I have a pair of 1963 Pierre Paulin dining chairs, never touched, and the foam is still comfy and "homogeneous"... but maybe Artifort didn't use the same kind of foam... or the "storage" has to do with it too.. ?
Anyway, thanks for your answer!
And if someone has another idea... don't be shy!
Rubber ages differently depending on environmental factors and I think the manufacturing process, too. Raw rubber is cooked in the foam-making process and I know that the raw rubber has to be very fresh to get the best results. There are a bunch of factors that by their nature would be hard to get exactly precise every single time, or from one manufacturer to the next.
Your chairs might also just have urethane foam, which also ages but doesn't get hard and crunchy the way latex foam does.
So, that said...I've done a lot of gluing of fabric to foam. Like, a lot. Spray adhesive for foam is essentially contact cement but with more solvents in it so that it's thin enough to be sprayed. The trick with fabric and foam is to spray a few light coats on each surface so that there are no big blobs of adhesive that will soak through the fabric, or soak into the foam which will then have trouble bouncing back after compression (because it just sticks to itself when mashed down.)
Ok, so...the problem with injecting foam---and i have tried that!---is that you get blobs of adhesive at the injection sites only, not a thin, even film over the whole area that needs adhering. In the case of the chair where I tried it, the blob soaked through the fabric and dried, leaving a dark spot that felt hard to the touch. Fortunately I had enough fabric left to redo that whole section. (It was all new upholstery, not a repair like you want to do.)
Maybe it would be possible with a small syringe but the adhesive is thick and tends to clog nozzles, and it would be tricky to pull the syringe back out without drawing some adhesive with it and messing up the fabric. But maybe there's a way. I can only speak for sure on what worked for me.
Hey again Spanky,
Thanks for all this information, you really seem to know your stuff !
And unfortunately you partially confirmed what I thought/suspected yesterday evening after posting...
Still... (stubborn inside) I tried today with white/wood glue, diluted in a seringue and a huge plastic bag filled with water to keep the pressure on it. It worked, but I think the fabric would've unstick pretty quick in the future, and it's proven to be long and fastidious to do it properly hahaha.
So I changed my mind, and removed the fabric from the chair (It'll allow me to properly clean the fabric also, which is cool), the foam's still good I'd say, no cracks or pieces "gone", firm and yet still "cushy", so I'm thinking about buying spray glue like you said and to put back the fabric properly.... but I've never done that before so any advice, tutorial, or whatever you could tell me besides being careful (that I am!, hehe) would be of great help 🙂
Oops, also wanted to apologize for the mistakes I surely make while writing in english but it's not my mother's tongue.
Thanks again!
Your English is fine!
The only adhesive that really works when gluing fabric to foam is the spray type that is like thinned-down contact cement. I'm sure you have it in France but I don't know what brand names it goes by. It stays soft when dry, unlike many adhesives, and mostly it just adheres to foam really well (also unlike many adhesives.
The downside is that you have to position the fabric very accurately before you smooth it into place after applying the adhesive. If you try to pull it back off, even immediately, there's a good chance it will tear surface foam off with it. It bonds VERY well and VERY quickly.
OK, so---the way I would do it is to anchor the fabric in place on the foam with 2"/4cm T pins. Once you are satisfied that it's straight and symmetrical, add a line of pins down the center back and seat to the front edge. Remove all other pins from ONE side only.
Now fold back the fabric onto the side of the chair that still has pins in it. Spray adhesive on a strip of foam and corresponding width of fabric down the center up to the fold in the fabric. I do about a hand's width at a time.
Let the adhesive get tacky (gloss should disappear but it will still be sticky to touch). VERY carefully, smooth the fabric back over the area with glue. You kind of have to hold it out taut so that you don't accidentally get a crease in it. Even a little slack area can turn into a crease if you're not careful. Having a helper is a good idea when you're new to this. And do a practice run with no adhesive!
If the first one goes well, repeat. You may have to vary the pattern of folding when you get to the angled parts of the arm. Practice first. You should always be able to peel back the fabric and glue every square centimeter of surface area on both fabric and foam.
Spray lightly and evenly. It's safer to do a light coat, let that dry a bit, then do another, and even a third, rather than globbing it all on at once.
Repeat the whole process for the other side.
This kind of adhesive has serious fume when you're using it, though it's not toxic when dry. Use outside or with REALLY good ventilation in a room that you can close off from the rest of the house. Use a respirator, or if you can do it out side just hold your breath and spray, then walk away for 5-10 minutes while it dries to the tacky stage. Below is the ingredient list so you can compare to whatever you can find and make sure it's the same type of adhesive.
Wow! that's a proper tutorial, thanks!
About the glu, I'll have to do a bit+ of research, since here they don't put the formula on every product, but in the worst case scenario I'll just have buy it abroad on amazon or ebay, etc. so no real problem.
But I do have a question... I read a few times your explanation and I think I get everything right, except I wonder how to do all this with the semi-rigid rubber-thingy that's all around the fabric, or maybe that's exactly the tricky part??
Because if remove it first, there's no way I could re-saw it after gluing the fabric. Or maybe I have to glue it too to the border of the chair?
As I understand, these chairs are machine-upholstered using some sort of a vacuum process. If you take it all apart and actually end up improving it, I will be absolutely shocked. If you do remove the edging, you might as well just throw it away. You can always tell when people mess with that part, because it always ends up looking like shit. I know that these chairs are professionally reupholstered by some outfits, but... just leave the upholstery alone. It's okay. You can immediately improve the chair by removing the married mystery base and using that H-base instead.
Hey Objectworship, thanks for your comment, always happy to learn something new!
On the above pictures the shell is just on a stool, not the actual base (I have a Low H-base, the chair was just shipped in 2 parts).
And Oh, I already took off the fabric and rubbered edge (I - personally - am not ok with un-sticked fabrics, wether I intend on keeping the chair or selling it) .... so either I succeed or I'll remove everything, I'm ok with both 🙂
If you need any help, please contact us at – info@designaddict.com


