This is my second vintage Eames Lounge chair that I am restoring. The first one being a 1978 Herman Miller production, the shocks on that were pretty brittle and came off easily with only a little bit of nudging. This time around I was working on a 1985 production and only one of the shocks came off by itself. The rest were either stuck in place or at some point been reglued and even drilled into and screwed in place. One particular shock mount was in a precarious position where there had been previous damage to the 'ear' and a crack was evident in the veneer. I was particularly concerned about removing that one so as to not fracture the backing further. But using the method outlined below I was able to take all of them off without any issue.
Most of this guide is based on knowledge that I gained from this forum itself. In addition I used a 'Shock Adhesive Remover' that I had sitting around from my previous repair. I had bought it from Modern Conscience. The bottle says it is a debonding agent for cyanoacrylate but it worked well on what appeared to be black (2 part) epoxy of some sort. I am certain that at least one of the mount still had the original factory adhesive. The adhesive remover definitely made the epoxy 'melt' within a few seconds, and you can feel it turning from brittle and crystalized to almost gooey in texture. You can see in the photos too, how it has stuck on to my putty knife after being affected by the adhesive remover.
Thing you will need:
1) Hair Dryer
2) Shockmount Adhesive Remover
3) Exacto knife or box cutter
4) Putty knife
Time required: 30 minutes per mount
Method:
My approach was to use a hair dryer at the highest setting and focus the heat on to the edges of the shock mount for a few minutes. Be careful as the shock mount and the frame would be hot to touch at this point.
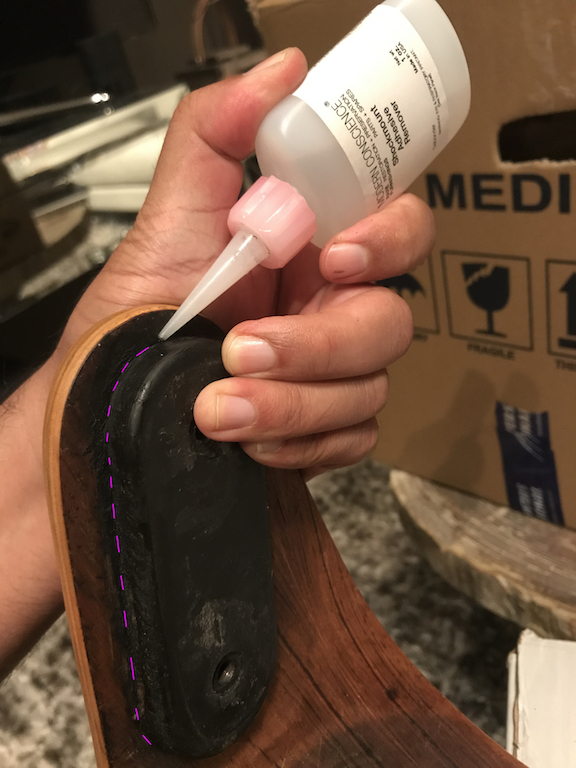
After heating the area well, I used the Shockmount Adhesive remover and applied it along the edges of the shock mount. All the way around and let it sit for a few minutes.
Next I took the box cutter and using the sharp blade I pressed in between the shock mount and the veneer, begin careful as to not cut into the veneer. Just gently trying to form a gap in between the shock and the veneer right where the glue layer is. Since the glue would be already malleable due to the above steps, you'll find it easy to create this gap for the next step. Using the blade carefully cut into the edge of the shock mount all the way around as pictured.
Now for the hard part. Using the putty knife approach the shock from the side as pictured. Wedge it in between the shock and the veneer. Once you've done that start applying consistent yet careful pressure to have it move forward. You will find a clockwise/counter clockwise motion would be the most affective when you do this. Slowly wedge the putty knife further and further. You will feel it cutting through the epoxy.
At this point, depending on how strongly the shock is attached, you may need to re apply the adhesive remover and let it soak through in to the wedge OR even use the blow dryer to heat the area a bit more. At one point I was stuck and the putty knife wouldn't go any further and I used a gentle tap to the handle of the wedged putty knife to force it further and thereafter continued with the clockwise/counter clock wise method.
With all that being said, just remember to be patient and not be too forceful. Once that putty knife gets wedged in between it is only a matter of time that the thing will come off. Also, resist the urge to snap the shock off by hand when your putty knife has reached the other end of the mount. This can result in the veneer being pulled away with the glue, damaging your chair. Just be patient and let the putty knife cut through all the way and the shock will come off.
As apprehensive and concerned that I was with the one particular shock glued on the 'broken ear', I have to admit that this method worked for me on that area too. I am attaching a photo so you can see.
This was just my experience and I thought I share it with you guys, hope it helps someone out who is setting out to do it for the first time.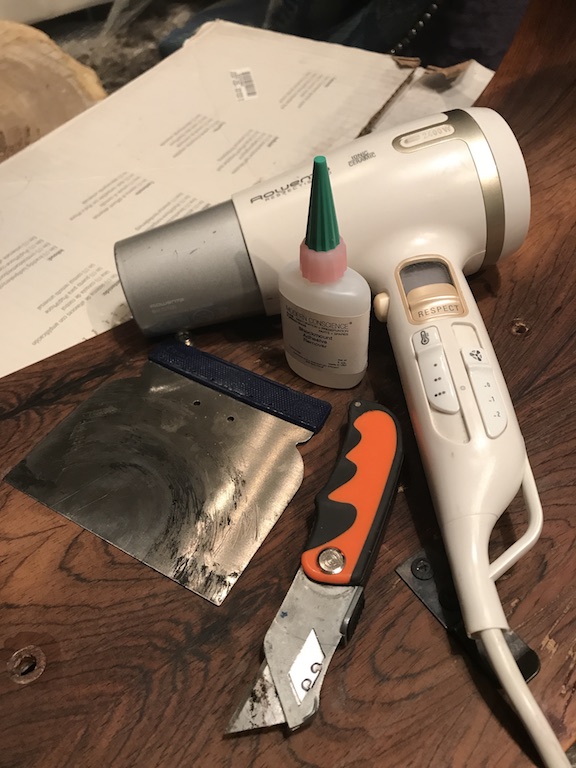
 <img class="wpforoimg" src=" http://d1t1u890k7d3ys.cloudfront.net/cdn/farfuture/UnhxfA4Z5XbCFPy
Nicely done and thanks for posting. Good illustrative photos, too.
I've had good success with a very similar technique sans the solvent. I found that patience and gentle heat worked well enough, though I'd recommend a narrower, sharp-but-dull (if that makes any sense) 1-inch wide flexible putty knife rather than the utility knife and wider "putty" knife that you used. I also had the advantage of using a pricey Leister heat gun with a 10mm nozzle installed that allowed me to adjust exact temperature and focus heat to a defined, small area (hot enough to produce potentially toxic off-gassing, but no scorching or smoke).
Which adhesive will you use for the replacements and what additional surface prep is planned? Will you reinforce the cracked ear?
Thanks for the inspiring post danielali, the work you did reminded me of why I became a design addict in the first place. One of these days, I will work on replacing the shock mounts on this 20+ year old dumpster dive made by either Hille or ICF (legit versions at one time). This chair requires/demands a lot of breathing room which I do not have at the moment.
If you need any help, please contact us at – info@designaddict.com


