Hi everyone,
First post here. Seems to be a lot of knowledgeable people on here and I would love some guidance.
I recently purchased this Eames LCW at a sidewalk sale. The price was so low I figured I should just get it and worry about how to fix it later.
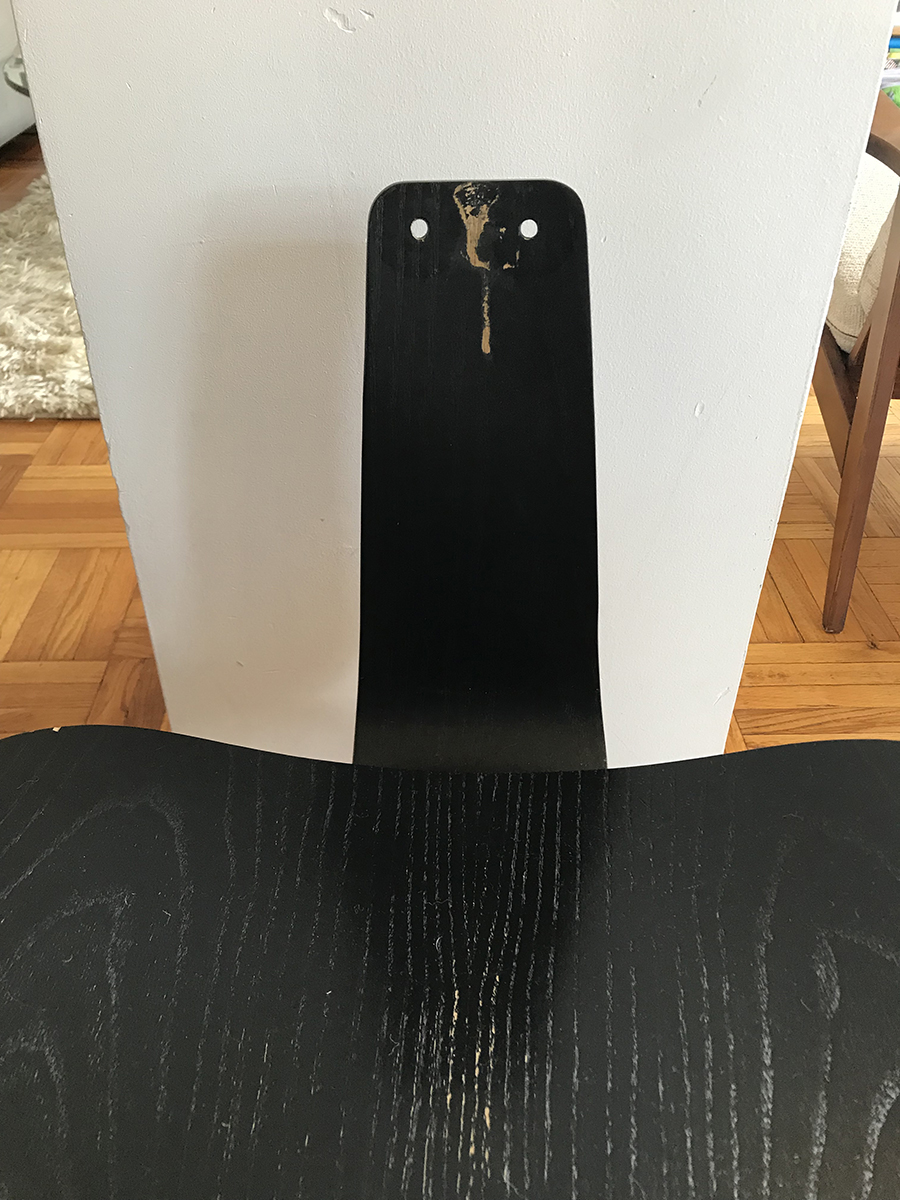
I'm guessing this is a present day production model and not vintage. The main issue is the back rest. The previous owners tried to repair it but it broke again and chipped a piece of the wood. What would be best for filling in this hole and re-laminating it to match?
Additionally I would love to refinish the entire piece as there is some wear and tear in the black stain and some gouge I would love to cover up. How would I do this? Chemical stripper or sand it? What kind of stain do I use to match the original look?
I'm not very experienced so any help and guidance would be greatly appreciated. Thank you in advance.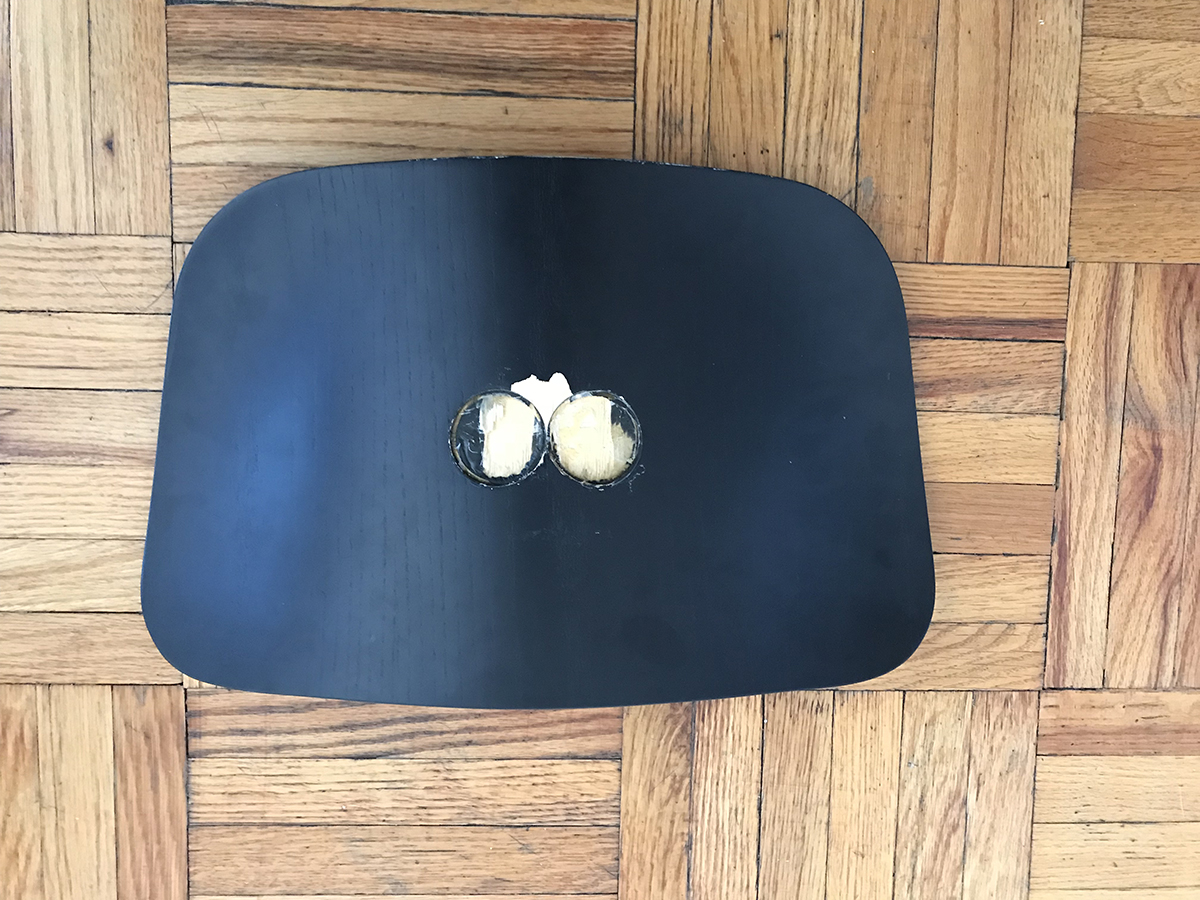
 <img class="wpforoimg" src=" http://d1t1u890k7d3ys.cloudfront.net/cdn/farfuture/PM0Yo3N1a7SDBuDyIoCUbq
Looks like black lacquer. Without getting too involved (as in stripping it or anything crazy like that), you could just pick up some black aniline leather dye and call it a day. Just wipe it on with a rag where needed. Or a can of any black stain by a reputable company at the paint store. I know General Finishes makes a decent-enough waterbased. For the repair, just use two-part epoxy putty. Kwikwood is available at most hardware stores. You can add black ink or oil-based paint or pigment to this when you mix it up. Push it into the void and then use a breakaway blade or razor blade or whatever to cut it flush with the surface. You can add some grain details at this point, too, if you want to be fancy. When it dries, lightly sand it and then hit it with whatever you are using to touch up the chair.
Thank you. Out of curiosity why would you not strip it down and re-finish? Too much work or just not necessary? Would stripping it down allow me to sand any of the gouges out? I'm happy to go the extra mile to make it look nicer, but also don't want o do anything that wont really help.
Thank you for the replying. The shock mounts on the seat base seem to be in ok condition They still have some give and don't seem rock hard. The ones from the seat back were covered in epoxy and wood splinters from the previous owners attempt to repair. I have replaced shock mounts and refinished Eames shell chairs before and I imagine its similar, but always happy to hear some advice. Should I replace all the mounts or is it ok to just do the two on the seat back?
Best to clean off old glue/adhesive completely from all mating surfaces. The worst part is removing residue from the round recesses in the back panel, getting down to bare wood (tedious would be an understatement here, but doing it right once beats having to re-do it hands down in my book). Make the repair to the panel after this step but before reattaching mounts.
I've had best results using PC-7 to re-adhere shock mounts to my DCM back panels. Rough-up the backs of the shock mounts with 80-grit, wipe mating surfaces with acetone, apply only light clamping pressure for the first couple of hours, wait at least 48 hours for full cure before assembly, and it'll last longer than you need it to.
The only reason you would want to strip this chair is if you didn't want it to be black anymore. The finish is opaque, which makes your repair work much easier. Just fill the missing bits and then color in. I do think an Ebony stain or black dye will make the work go faster in spots, but you could always fill voids, then give the whole thing a scuffing with 320 grit or so and then put down a fresh coat of black lacquer in a rattle can, if you felt like it.
@tktoo. Thank you. What do your recommend using to clean out the residue from the recesses? A hand tool or should I get something like Dremel power tool?
Regarding the repair. Is there any point in trying to replace the veneer on the broken area or is it not really possible?
@mcgee76 Thank you. Sorry to keep asking questions. I'm a novice and want to understand and learn.
- I don't mind the black. If I had the cash to buy a new one I would probably not get black, but given this was a steal of a deal I couldn't pass it up. I would think that the wood underneath as not as nice as one that is not black so keeping it black is the best bet?
- Is lacquer what the original finish is?
- I just want it to look as good as possible. If I can achieve that by filling the voids with Kwikwood and giving the worn areas a coat of dye then thats what Ill do. But if there is a way to make it look more like new than I would try that option.
dburke, I'd avoid solvents or power tools in favor of mechanical removal by hand. One slip, and the task can be complicated exponentially. I've used varieties of X-Actos, scalpels, small carving chisels/gouges, and even dental picks to carefully scrape and carve out the residue. Good light, magnifying eyewear, patience, and a shot of brandy are recommended.
Sure, you could do a veneer patch but, under black paint, I wouldn't bother. Scratching some grain lines into the putty fill to mimic the surrounding texture before top coating might help to disguise the repair.
I'd listen to mgee's finishing advice, too. He knows his shit.
Thank you @tktoo. The previous owners repair attempt and subsequent breakage pulled a bunch of the wood out of the shock mount holes (you can see this in the photos I posted before). If I make bottom of the wholes level, I'm guessing it will be about 1/16 to 1/8 of an inch deeper than factory. Do I need to compensate for this in anyway?
I'm happy to follow @mcgee's advice. I'm just trying to learn as much a possible from everyone here. The finish actually has a lot more wear and tear, scrapes and gouges than I thought. Its all over and around the edges. Not sure if this changes you or @mcgee's advice for refinishing. But I'm guessing no. Just go over the problem areas with a dye or stain? I don't mind extra work as long as its something I can pull off and it will result in a better end product.
Just hitting it with dye or stain would suffice for most people, I think. Before you do anything, you should decide how far you want to go with it. A new, thin coat of black lacquer is how I would finish it.
If you want to get really anal, I would suggest you get some Kwikwood or similar product and just play with it a little bit. It dries relatively fast, compared to other fillers, but has a good amount of workability within that window. Tinting the filler with pigment before applying it will save you time down the road, if you choose, but it isn't required and different additives will have different effects on the consistency and dry times of the epoxy.
What I do when I am repairing a piece with a lot of little nicks is mix up a little more putty than I need. Then I just go around the piece, pushing little blobs of it onto the spots that need work. I make sure to pack it into the void, then roughly level it off with a razor blade. Unless it is a perfectly flat surface, I leave the fill a little bit proud of the surface. Your chair is all curves, so you'll have to experiment. The best way to level off with a blade is to bite into the middle and pull away... do this from both sides. This way, you avoid pulling the putty up out of the other side. I work quickly at this stage... you should feel free to take your time, perhaps mixing up very small batches as perfecting each fill as you go.
Once I have hit every spot, I go back with the razor, to the beginning, and trim excess and things like that. The putty will start to get firmer and hold its shape against the blade better... this is important for doing things like mitered corners and the like. When it doubt, leave the fill proud because you can always sand it or cut it back after it has dried.
You will get better results adding grain into the fresh putty, but it is not difficult to use the tip of the razor blade like a carving tool and draw lines in the dried stuff... you are basically just cutting lines for the light to hit, preventing a perfectly flat surface amidst all the grain lines on the rest of the chair.
If you aren't happy with a fill, just let it dry a bit, pop it out, and start over. Once you are happy with all the repairs, though, color or paint them in with a fine sharpie or anything else that will darken them and make them black. Then sand the whole chair with 320 or 400 grit sandpaper. Finally, get a rattle can or two of black lacquer and give it all a nice, thin coat. You want to make sure the entire surface is wet, but not flooded. I can give you more detailed advice when you reach that stage, if you want.
I would suggest taking the chair apart as much as you can before doing any of this.
No need to excavate deeper. Just get out 95% of the old glue residue exposing bare wood. PC-7 is an excellent, structurally strong gap and void filler. Part of the trick is using enough but not too much. Excessive squeeze out should be cleaned up right away (within 1/2-hour of assembly before it sets up) with cotton swabs and alcohol.
Clamping can be a bit tricky. When you're ready for that step, check in and I'll respond with the simple trick I've used successfully more times than I care to remember.
You get extra points for posting pics along the way.
Do I get extra points for words beginning with "ex"?
A big thanks ti both of you.
@mcgee
I want to make it as close to new looking as possible. You notes on the putty make perfect sense and I will try that. A couple questions:
- Is lacquer what the original finish on these chairs is made from? In my untrained mind lacquer is much shinier than what the chairs looks like. Is it going to look vastly different from the original once I lacquer it?
- When you say sand it, how much sanding? Just scuffing it up, sanding it till I smooth out some of the marks or really going at it?
I think no matter what it will end up deeper than the original holes just b/c of how much wood was pulled out when the chair broke. But I will try to keep it to a minimum. Is it an issue of the shock mounts sit a little deeper than intended? Should I put some of the putty in the bottom to create a higher surface?
Will post pics for sure and let you know when I reach the clamping stage.
Thank you
After removing residue, go ahead and fill and level the bottoms of the sockets with PC-7 leaving +/- 1/8" of depth and let it cure 48 hrs. PC-7 will bond to itself IF you clean off the waxy film (amine blush) that forms on the exposed surfaces as it hardens. Use acetone (nail polish remover) on a cotton swab and work carefully. Acetone dissolves lacquer on contact. It also helps to scratch up the hardened surface of the cured epoxy with 60-grit sandpaper.
Did I mention that this is all quite tedious?
If you need any help, please contact us at – info@designaddict.com


