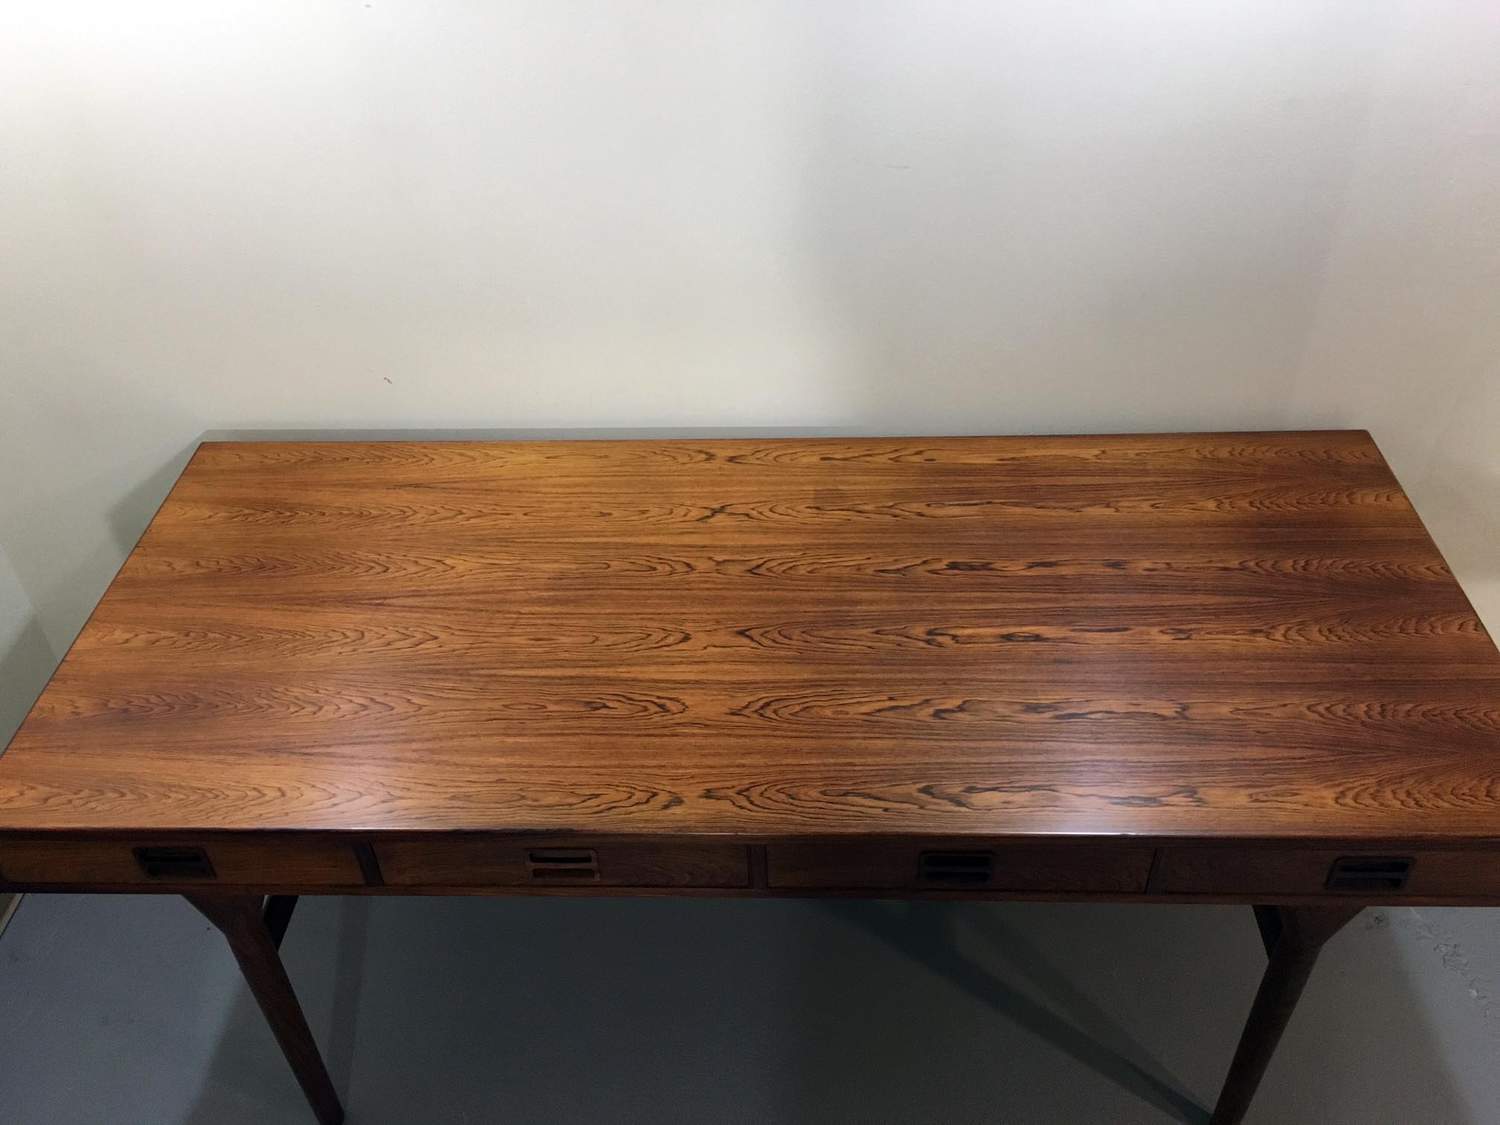
As posted previously in the last-thing-you-acquired thread, I was fortunate enough to buy a Nanna Ditzel 4-drawer rosewod desk off of craigslist last week. Yesterday, I did my usual cleaning / wood reconditioning routine on it, and got some decent improvement for the finish. However, the desktop still has a decent amount of uneven fading all over (including a couple of circular marks), some expected scratches, and a small veneer chip missing from the bottom right face of the third drawer.While I have come across all of the above issues on previous pieces, this is the most valuable and collectible item I have ever owned. There are a few options that have popped into my mind about what to do next. However before stating what they are, I was interested in what the next step would be for those on this board.I am currently undecided on how long I will be holding onto this desk. I really want to use it for at least a few years before finding it a new home. But at 175cm (69") long and 75cm (29") wide, I'm having a hard time finding a suitable place in my house right now.Sorry for the bad photos, but it's in my basement right now and the lighting is not very good down there. <img class="wpforo-default-imag
Leif, while once again the lighting in my photos is bad, the second image is somewhat accurate as to the fading issue. One side of the table is darker, with the other side faded. The circular stains could be darker water stains on the faded area. My understanding is that the oxalic acid will help to eliminate dark stains in wood, but do nothing for faded rosewood.
Are sanding or staining the only two options for darkening faded rosewood? I think I'd have a hard time bringing myself to stain rosewood. My main goal right now is to even the appearance of the finish out, provided it can be done without removing the existing finish. From what I've read, that might not be possible.
My very limited experience with rosewood tells me that there may be no alternatives beyond either dyeing the faded areas to match or mechanical removal of the damage. Neither of which is an appealing prospect and both are likely best done by a skilled pro, IMO.
If it were mine and I were determined to attempt *something*, I'd start with Leif's suggestion and treat the entire surface with oxalic acid. Ideally, you'd first remove any existing finish with the appropriate chemicals. Normally, this requires testing to determine what, if anything, is on there. I use progressively aggressive solvents applied in small, less visible areas by wetting a cotton swab, gently rubbing it on a small area (with a circular motion hitherto unknown to the peope of these parts) for a few seconds, and then blotting it with a clean, white rag so that I can see any color that might come off or tell if the spot has become sticky. Sometimes, we get lucky and a good rub-down with naphtha followed by a quick scuff-sanding with 320 is all that's needed. Of course, you could skip all this and just strip it with methylene chloride, too, but, well... you know.
The deep scratches: Were they as obvious before you applied the Howard's product? Those will probably require some elbow grease and a good, flat sanding block and/or a super-sharp scraper I'm afraid. Restore-a-Finish contains a variety of solvents, oil, and asphaltum as a colorant. I suspect it got into the exposed endgrain in the scratches, darkening their appearance. Bummer.
To my way of thinking, celebrating the warts and blemishes of honest wear is often the best course. That's what I tell my daughters when they comment on my appearance, anyway. I guess I've never really understood the point of trying to make something old look brand-new, though heaven knows I've tried more than once to do just that. I like to think I've learned from my mistakes and that compromise is our highest possible aspiration.
Thanks for the thoughts, tk. As you already inferred, doing nothing further is certainly one of the main options I am considering. I too do not mind age marks on vintage pieces. However, in this case, I wasn't sure if doing nothing was the best option, or if there was some minimally-invasive option that would even out the fading marks a little to make them less noticeable.
The scratches may have gotten a little darker. As is often the case, I start working on items before thinking about "before" photos. There were a lot of cloudy areas in the finish that disappeared nicely.
By coincidence, the same desk is up in Wright's upcoming Scandinavian auction, so I'll go examine that one to see what condition that finish is in. They rarely do close up photos online.
Tktoo: I didn't know you were a Zappa fan.
If you do use oxalic, please remove the finish. I experimented with not removing the finish just once, and it was a very bad idea. The entire surface came out with leopard spots from where the oxalic had unevenly penetrated. It took rather a lt of work to fix that.
One possibiy minimally invasive option would be to leave all the damage and existing finish alone, and add toned oil finish on top. You would need to spot check for compatibility with the existing finish. Then either use tinted Danish oils, or mix you own with something like Formby's Tung Oil Finish and a small bit of artists oil paint. You would need to apply it artfully only to the areas that need darkening. And expect it to take 5 or 10 coats or so.
The virtue of this is that it is all in the finish, and you will have done nothing to the wood.
After half a year of contemplating, I finally decided on a course of action recently.
In addition to the uneven fading, scratches, and water marks on the top surface, there was also a few areas where the finish (whatever that originally was) was worn and dull. So I decided on a "lightly refinished" approach for the top surface only:
1) removing old finish with heated Murphy's Oil Soap (thanks leif),
2) light sanding with fine grit paper (up to 400) to even out the finish better. The intent was not to make the surface perfectly uniform, and I did not want to sand too much.So there is still some fading variation, marks, and remnants of scratches, especially the deeper ones, but not so noticeable any more.
3) applying a paste wax coating on top, then buffing to produce a similar shine as before. I don't have much experience with paste wax for a finish coat. I mostly use it to lube sliding wood components like extension tables and sliding doors. While the appearance is nice, I'm having a tough time removing that last tiny bit of wax that causes fingerprints easily when touched. I've gone over it a few times with a clean dry rag, but I'm still getting fingerprints. Any suggestions?
There was also a small veneer chip on one of the drawer fronts. Luckily I have some nice scrap rosewood from a broken dining chair that I cannibalized to fix one of its siblings. As more luck would have it, I found a decent match to the grain, and got even luckier by creating a "tablesaw veneer" chip on my first eyeballed attempt. After some careful cutting and sanding with a Proxxon (German Dremel rotary tool), I got a pretty good match.
Neither desk top refinishing nor veneer repair are perfect, but I'm happy overall with the results.The bigger concern was not making anything worse, rather than making it perfect.
Unfortunately, the desk is still in the basement as I try to work out a good locations for it upstairs.

cds – Very nice veneer repair! And it looks like the discoloration on the top is all but gone.
As for fingerprints in the wax, is this improving over time? It may be that the wax is still drying. It is my understanding that waxes can vary in hardening time from mere minutes to several weeks.
My basement lighting is horrible for photographs. There are still some fading patterns on the top, but they are not as pronounced as before. The paste wax application is less than a week old. I'll keep checking over the next few weeks and hopefully it improves. I'll keep rubbing with clean cloths as well.
I need to reiterate the lucky part on the veneer. It only occurred to me last weekend to try to shave off a piece of the snapped seat rail rather than procure a small piece of veneer facing. I just eyeballed the first run on the table saw to see how thin a piece I could make, never thinking that I would hit the right thickness on the first pass. Also, as you can see from the scrap piece in the photo, there was only a little piece of finished surface left, and that piece just happened to have a grain pattern that matched pretty close to what I needed, so I didn't even need to polish and finish the piece..
Something tells me that my next veneer repair effort won't go so smoothly.
That looks just gorgeous. Nice work.
I second teakhound's advice regarding drying time for different waxes. Buff it again in a few days with a fresh microfibre and see how you get on. I also realised once that the problem was I applied too much wax in one go. So I went over it with very very fine steel wool and then buffed it to a very nice sheen.
If you need any help, please contact us at – info@designaddict.com


