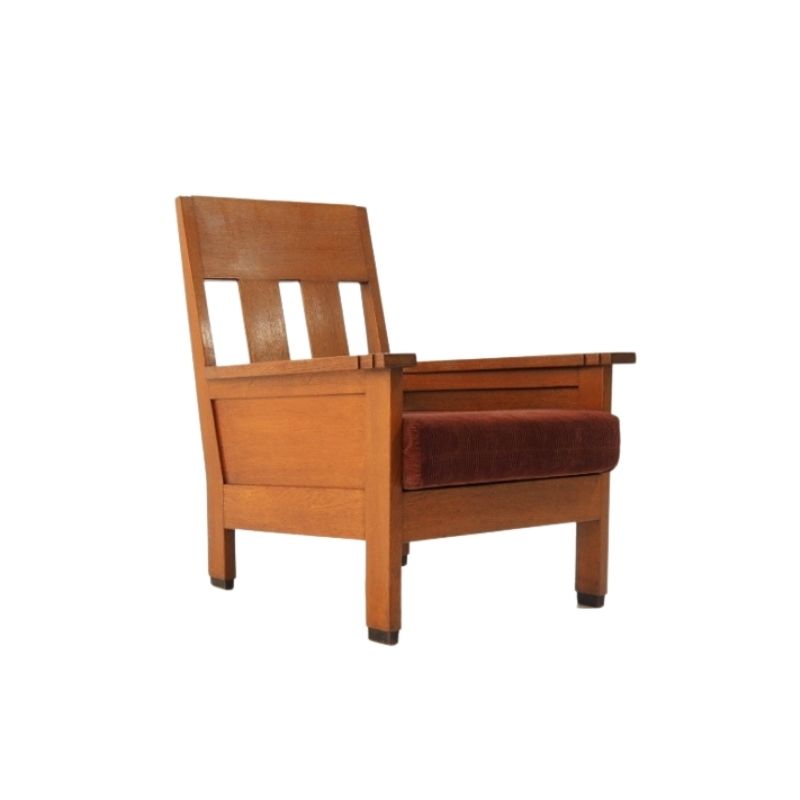
Hi, found this chair in a thrift store for $15.00 and couldn't pass it up.
The chair is a keeper but in its current state, it needs some help.
I need direction on what to do with the one arm that is damaged.
The previous owner put two screws into the arm and
there is a one inch cut on the side. See photos. I'm going to clean it up,
change the upholstery, fix the arm and enjoy it.
Any suggestions would be greatly appreciated. Thank- you <img class="wpforo-default-imag
Unfortunately, you really need to take it to a professional to do a repair that is nearly indistinguishable from the other, un-broken side, and robust enough for continued use.
Best way to shore the break up, in my opinion, would be to drill the center of each part of the back stile and glue together with a wood dowel or metal rod in the center. The trouble is, that to do so, you would pretty much need to disassemble the rear of the chair. The joinery between the backrest and the back stiles looks relatively risky to disassemble, considering its conspicuity. I would pull it apart where the back stile meets the seat rail/apron. drilling out the center of the pieces accurately is also rather difficult if you don't have a drillpress or lathe to execute with precision. Finally, if the break is too gummed up with glue, then it will be very difficult to get the break reassembled tightly, without seeing the crack all the way around (which would then need to be minimized by artful finishing).
After that, is the artistry ... you need to find some oak to cut bungs (plugs) for the screw holes and also the missing sliver at the break site. Cutting these pieces to fit perfectly takes some skill and patience, and once they are in, you will need to sand it all flush. After that, it is just a refinish, whether you do the whole chair or just the affected stile will depend on your motivation for perfection and whether your finishing skills are good enough to match new to old.
All things considered, if the original repair is still structurally sound, you might be better off just leaving it as-is. You could plug the screw hole with an Oak bung, and be done with it If you want a collection piece, then you either need to enjoy wood working (and be skilled at it), or be prepared to drop some money on a professional fixing (if possible), or making you a whole new rear-left stile.
... but this is just my 2 cents.
I think you might be best off with an entirely new leg/stile. It is White Oak, not Red Oak.
One other challenge is that the cross shaped inlays in the backrest cover the screws that hold the backrest to the leg. So at some point you are going to have to remove that inlay, very, very likely destroying it in the process, and then the inlay will have to be re made as well.
I'll give a third option, which I have done a variation of twice.
If you are unsure if the break is glued, unscrew the two screws and see if you can move slightly apart without putting too much stress on the backest joints. If loose, apply wood glue, clamp, clean excess.
Since the screw heads already look to be recessed, I would consider reinserting them for added strength to the break repair (although if the wood fits tightly back together, it shouldn't really matter if you clamp properly.
Create some fine oak saw dust, not "sawdust" from a table saw, but a fine powder that you can get from a grinder or sander.
Mix the oak dust with some wood glue to make a paste. Apply over screw heads (or holes without screws), as well as all gaps and recesses in the wood. Shallow wide fills can be difficult and require multiple passes. Use a credit card or flexible stiff edge to clean infill to be flush and smooth with adjacent wood surfaces. The paste might shrink a bit as it dries, so slight doming could be attempted or you could do a second pass if the dried paste has a shallow depression.
If you're lucky, the dried infill color will be a close match to the existing wood. If not, then, you can stain, oil, color wax, etc to match. This is something that can be practiced on a scrap piece of wood to know which treatment provides the closet match. Actually, almost everything I've said above should be practiced on a scrap piece of oak first.
This option won't be as thorough as the first two suggestions, and the repair will always be visible. However, it is something you can do yourself very cheaply, and does not mitigate the other options should you want to do those in the future.


If you need any help, please contact us at – info@designaddict.com