Having repaired dozens of failed Eames shock mounts over the years, I should have been more vigilant to the warning signs. One the original factory glue joints on my 1976 lounge failed while I was sitting in the chair. You can guess what happened next. The chair back, supported entirely by one side, swings back and snaps the beautiful rosewood shell. I felt sick. I looked into 2 possible repair options. Alfie Hume's solution... to replace the lower back panel with a new rosewood shell, color matched to the originals, with new shock mounts, would run about $2500. No slight on Alfie's work, but that's $1000 more than I paid for the chair, and I'd still end up with rosewood from a different flitch than the original. The place that does the wooden shock mount replacements (I forget the name) had a different plan. They'd router the inside of the shell, leaving only the outer rosewood ply, and laminate in new inner plies. That repair was about $900. With their wooden shock mounts, it came to about $1600. I figure that for that price, I can probably find a an original lower back panel. In the meanwhile, I thought I'd take a stab at my own repair. What have I got to lose? I'll post pix of the process. 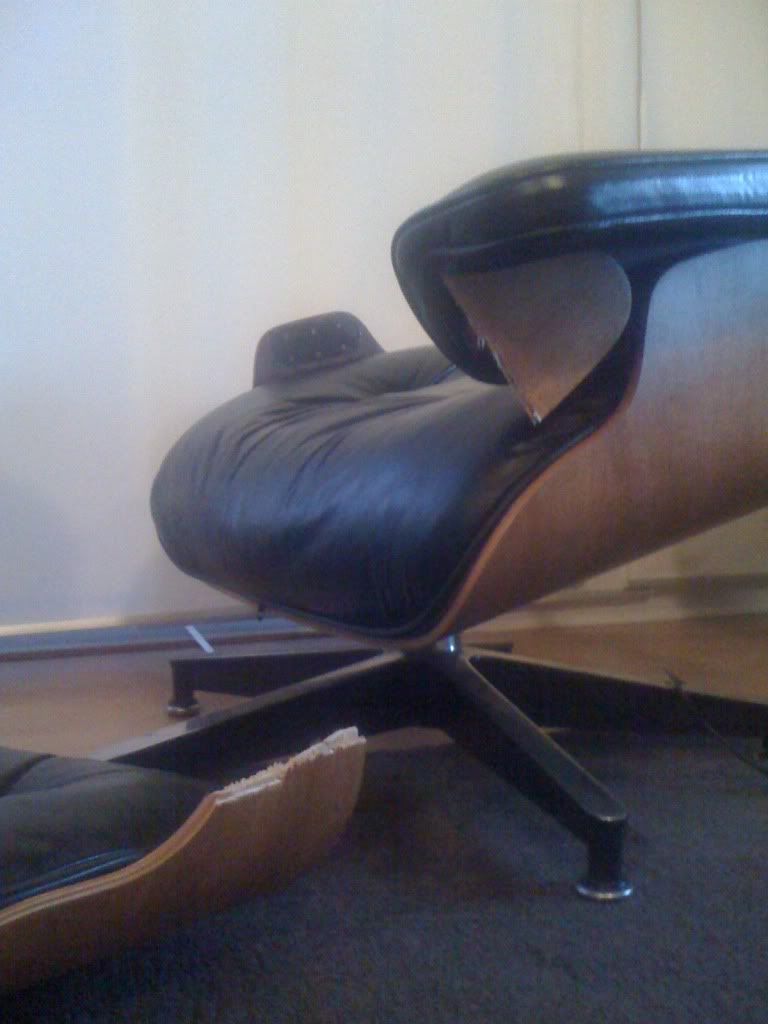


continiued....
I'll save you all the suspense, and post the finished project first. Then, for all interested, I'll post the process, which cost me about 4 hours time, and roughly $20.
http://i778.photobucket.com/albums/yy66/chrome1000/Eames%20disaster/DSCN...
This
lovely chair has become the bread and butter of many repair shops.
I fixed mine like an old wooden boat. It will never need repair.
If it was a car it would have been re-called long ago...
If you have one, it will fail. You will be tossed behind it like a sack of potatoes
against the wall. Don't park it in front of a wall of glass on an upper floor!
Lovely chair. Horribly designed.

Surprising
that the revered Doctor Eames would have failed to design this part correctly -- and that it took so long for the fault to become as obvious as it now apparently is ?
Could a metal mesh (?) or similar layer -- glass fiber cloth ? -- have been introduced into the lamination, at this point, to prevent such catastrophic failure ?
I may come into possession...
I may come into possession of a loungechair, the following days or weeks. An old factory nearby is lavished with niels moller rosewood chairs, MIM-Parisi desks and exceptional commissioned furniture.
There is also this faded lounge-chair, sitting in the sun for many, many years...
I would like to know if I can do anything preventive, something invisible?
I have to say
I'm SO sorry that you were flipped like a pancake, Poach, but it seems to me that some of the responsibility lies with the owners as well as with the chairs.
Sure - the shockmount design comes with it's own set of issues. We all know that they can come loose and fail - often (as in your case) catastrophically, and sometimes quite suddenly.
But mostly the chair gives some warning signs first - an exaggerated flex is the most ominous. And if you slide your fingers under the wood when sitting in the chair you can feel if the mounts are fraying or splitting, or if they are still solid.
Just like a car this chair needs maintenance - as does most furniture. Nobody hesitates to fault the owners for letting the leather dry out and crack, or for leaving the chair in the sun to fade. The owners should be made aware that the shockmounts should be replaced when they have too much give - either through Herman Miller or a third-party source.
I have just purchased a 4...
I have just purchased a 4 year old Herman Miller chair and looking at those pictures makes me shudder.
Like Whitespike, I`d like to know if the shockmounts on the more recent chairs are less likely to suffer a catastophic failure.
I have heard that the more recent chairs have had their shockmounts `beefed` up, can anyone confirm this?
mea culpa
Yes... it was bsolutely my own fault. As I stated in the opening of the thread, I should have been more vigilant of the warning signs. In fact, I had noticed a bit of creakiness, and though maybe I should check the mounts, but put it off. Thankfully, I was not flipped. I didn't fall out of the chair. I wasn't hurt in the slightest (broken heart not withstanding).
I didn't mean for this to be a referendum on the chair's "design flaws." That's been covered in several other threads - usually as a thinly veiled solicitation for repair work. For all the whiners, you're welcome to post for comparison all the products you've had in uninterrupted production for 52 years running. I loved this chair when I bought it, still do, continue to sit in it every day.
And yes... I will be posting the whole process. Just had to get all the pictures together.
Repair Process
Please be patient, as this will take several posts to complete, and I'm not 100% finished with the job.
Okay... After considering a variety of possible materials and processes to fix the chair, I decided to use one the Charles and Ray's other favorite materials: fiberglass. It's stronger than wood, has similar flexibility, bonds well, and is fairly easy to handle and form.
First, I needed to make a place for the new structure. That means using a router to remove almost all of the material in the area of the break, except for the outer rosewood ply. I used a Dremmel mini router (roto-zip style) to remove the inner plies.
Process continued
As you can see, it took a while to get used to the tool and figure out which router bit worked best. The first image shows quite a bit of chatter along the edges of the cut. I had to get a different collet for the router at the hardware store. The stock collet for these mini routers only handles 1/8" bits, and the router bits I bought were 1/4" drive. I had the best results with the 3/8" router bit. The larger ones tended to feel a little wild and unpredictable. Good thing I had the pieces well clamped.
A caliper might have come in handy here, but I just used my fingers to continually test the remaining thickness of the plywood. I wanted to make sure I'd have as much depth as possible for the new structure. But if I went through the outer veneer: game over. So grind... check... check... grind... check.
Once I was comfortable with the basic size and shape of the well on both pieces, I assembled the two pieces, and held them tightly together with gaffer tape. Then, I did a final bit of routing to make a smooth transition between the two pieces.
All in all, this took about 2 hours.
Oh... BTW, the photos are all wider than this column will display normally, so you have to use the little slider widget at the bottom of the pictures to view them in full.
Process continued
Time to lay up the fiberglass.
I picked up some random strand fiberglass cloth and resin gel at the auto parts store. When I got home, I cut a piece to the shape of the channel I'd created, and then cut another 15, or so, using the first one as a template. Then I layered them into the channel for a test fit.
I mixed up a batch of the resin gel, going a little easy on the catalyst, so that I'd have as much time as possible to work with it. Anyone who's ever used automotive body filler has has the experience of it setting before you finished smoothing it out. Anyway, once mixed I coated the whole inner surface of the channel, to make sure I'd get good adhesion to the wood. Then I used a plastic scraper to saturate several of my little cloth cutouts, and carefully laid them into the channel.
Before messing with any of the fiberglass, I'd snapped on a pair of latex gloves; so now, I just used my hands to press out all the air bubbles. As soon as I could feel the resin starting to get a little rubbery, I stopped. At this point, the channel was about 1/2 filled.


If you need any help, please contact us at – info@designaddict.com