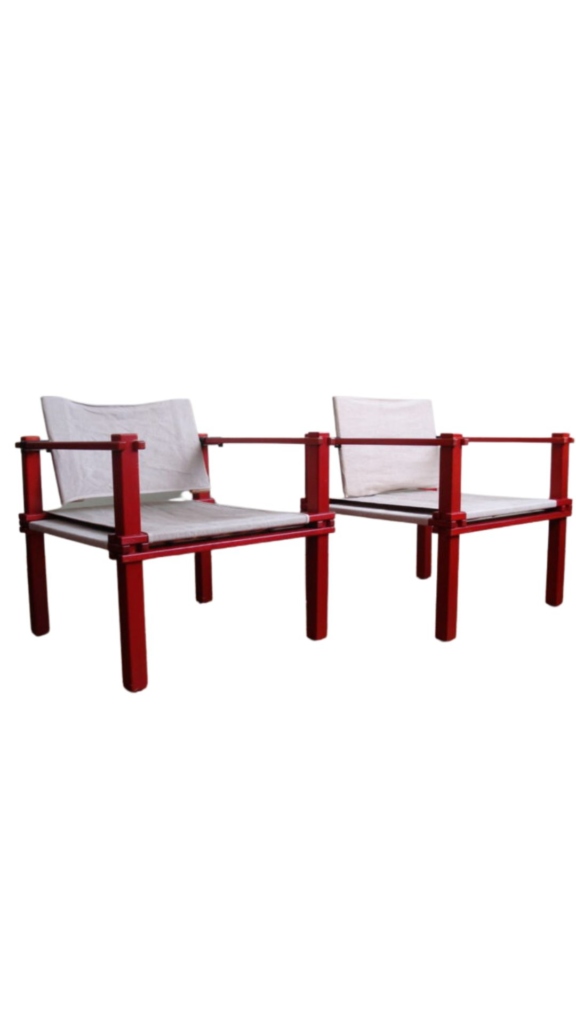
Hoping someone might shed some light on how this was done. The pics show some kind of canvas-like straps that went between the wood frame and the end of the spring. The spring is not long enough to reach all the way across the frame, so whatever strap was there had to extend a couple inches, or so. What's left of the straps is too brittle to even know what they are made of.
Would love to see a pic or diagram of the correct setup. Thanks so much. 

The impression in the foam is that of a zig zag spring. They are not too common in Scandinavian pieces, except some Swedish and Norwegian makers. They are attached with a fold of metal or rubber strap. A nail or staples goes through the ends of the attachment piece, and the the end of the spring inside the fold.
Maybe the straps were there to protect the foam from the metal spring? Or maybe the zig zag springs were some upholsterers idea of a replacement for the original straps?
Thanks for your reply, Leif. I only refer to it as Danish because the original owner told me it was imported from Denmark. As to the springs, you are correct that they are the zig zag type. Owner said they became loose over the years and they finally just took the last couple out. They still had all six of them. He spoke enough about it that I am certain they are original.
I'm sure I can figure something out that will work fine. I just think it would be cool to do it as close to original as possible. However, I'm getting the feeling that this may not be a common enough method to find an example of.
It may well be that the white straps were folded over to hold in the ends of the zig zag springs. I re-upholstered a recliner by Stranda Lenestolfabrikk in Norway that had zig zag straps, and that is how they were attached to the frame: a short fold of pirelli webbing was stapled into the frame and the end of the zig zag strap was held in the fold.
What does the chair look like?

I've never seen that particular way of installing sinuous springs, but I did find this patent application (?) in an image search just now:
https://www.google.com/patents/US6263573
It's way more recent than your chair but it's a pretty simple premise, so really not at all unreasonable to think that others came up with the same idea in the past. The reasons he gives for doing it this way include greater comfort and noise reduction. I know that the metal clips that are usually used to secure the end of the spring to the frame are just held in place with a nail or large tack and they often come loose over time. This webbing technique seems better in that way--but the webbing won't wear nearly as well as the spring.
The webbing material on yours looks like it might be Pirelli but the way it's crumpled doesn't look quite right for old Pirelli.
Thanks,spanky, for taking the time to dig around. I think you are on to something with this discovery. The length of my springs definitely suggest that they stayed short of the wooden frame on both ends, but I hadn't considered that the strap would run the entire way across as opposed to just short strips on each end. This method would clearly make the springs more stable, as well. And, as I look back at the photos, I can see little bits of white debris clinging to the foam under the seat. I''m betting when I look closer at the actual chair those bits will turn out to be from the deteriorated straps that laid against the foam.
It's also interesting that this would have been done so long before someone patented it. The purchase date is without a doubt 1969, per the original owner.
I posted in the ID forum trying to figure out who made/designed the chair, and Leif made mention to it's possible origins based on the springs, in this thread. On that . . . there's a chance the owner may actually have the original receipt from when he purchased it overseas in 1969. Not sure what the receipt might reveal, but might offer a clue, at least. In the meantime, I'm still open for any info on that side of the story, too.
By the late 60s, the Danish furniture industry had gone into serious decline. So my speculation on the origin may not be as valid for that time period.
One of your toughest questions is going to how to reattach those zig zag springs. Normally you would attach them without the upholstery in place. However it looks like the upholstery is fine, so it would be sort of unfortunate to replace it just to re-attach the springs.
Perhaps you could attach the springs, or slightly shorter ones to a board at each end, then attach the new boards beside the original mounting boards.
Probably the webbing broke after awhile and was hanging down in an unsightly way so someone just ripped it all out, not realizing the consequences.
I have reattached one or two webbing strips the way Leif described. It can be done, just make sure you use hardwood and screws to anchor it to the frame. It will be awkward to get the webbing stretched before you fasten it in place. Get someone to help if possible. And do not cut it in strips before you start! Anchor one end and stretch and fasten it, then cut it; repeat until done. This way you always have plenty of webbing to grip as you stretch it. You can measure and mark the first one so that you get the same amount of stretch in each. You may not even have to stretch it much since it's mostly there to support the springs, and Pirelli doesn't have a lot of give anyway--I dunno.
You can fasten the webbing to the original frame under the added strip of would. I would use a pneumatic stapler with 1/2" staples.
Leif - I like your suggestion of adding a new strip of wood to the inside of the existing frame. I believe the original springs are short enough to allow for the needed space.
modernefamilie - You would know me if you saw me. I realized who you were when I saw a post you made about an item that I ended up buying from you. 🙂 It's been awhile now, but the last stuff I got from you was a Laurel floor lamp, a small danish dresser, and some Poul Volther dining chairs.
Did you see this chair in person and visit with the owner? He's a fascinating guy, and he certainly traveled the world, along with his trusty leather chair. 🙂
I don't think it will take any pressure off the added wood or screws, but it will keep the webbing from slipping out from behind the strip. An alternative would be to put some kind of serrated metal strip under the wood but I don't know where you'd get such a thing. There are individual serrated clips that are screwed into chair frames to hold webbing, usually found on vintage American chairs, but they tend to come loos over time.
I would just put a screw into the wood strip between each webbing strip. Obviously pre-drill so to minimize splitting of the wood, and you might also want to round off the top outside edge of the added strip just a bit, to lessen the wear and tear on the webbing. I think a 3/4" thick strip is probably plenty of width; not sure what size screws would be best, though.

If you need any help, please contact us at – info@designaddict.com