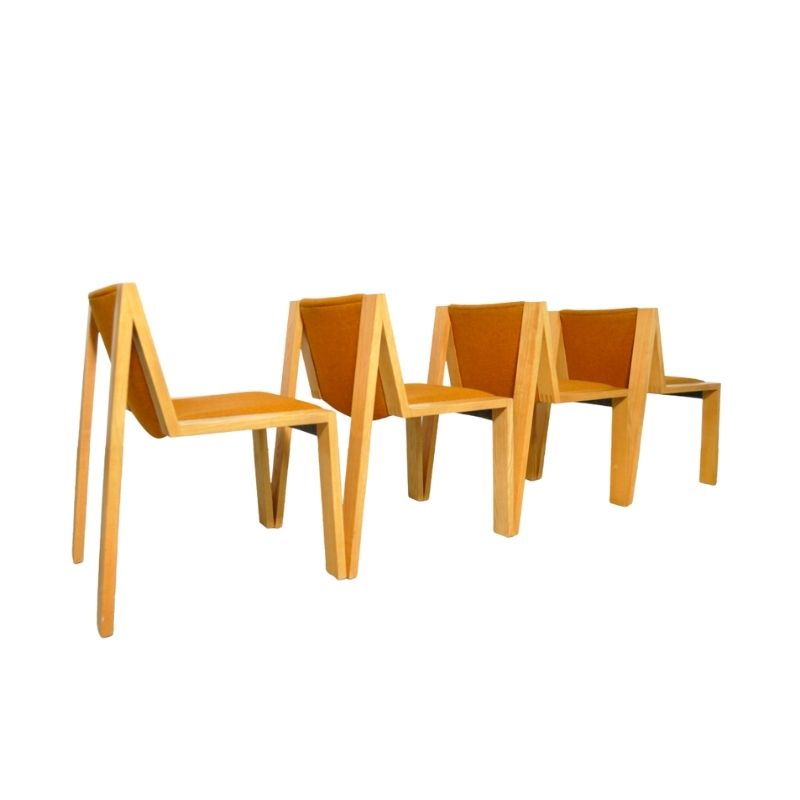
I thought weaving one chair would be my daily limit
But today I ended up doing three. It was kind of a long day though. So, I have four done, and two left to go, which I should take care of today.
(Addendum: I did finish all six the other day. It took three days of work altogether).
Danish Cord weaving instructions
Hello:
Very much enjoyed reading your notes. Your results are certainly beautiful - and well photographed too. With regard to weaving instrucions, I found the "Caner's Handbook" to be more of a help than the Fine Woodworking link, although that one is a good introduction. I just finished re-weaving the first of six chairs - one of six we bought shortly after we married, forty-three years ago. The entrprise may seem daunting at first, but is well worth the effort. You can obtain a copy of the Caner's Handbook either on Amazon, or at your local public library. Best of luck!
nice job, tchp!
I missed your update. They look great!
Yesterday I finished a bench seat that is about 4.5' wide but not as deep as a chair seat. Wrapping the front and back rails was more tedious than on a chair but otherwise it went pretty smoothly. I started a single N. O. Møller chair tonight, since I'm on a roll. They do go faster when you do a bunch in a row. Less thinking, more rote work.
Cord Weaving Website
I have a hobby of creating instructional websites on topics that interest me, which is something I first started doing in 1997. After completing the weaving of the fourth chair of those pictured above, I used the fifth chair to photograph the process of doing the weaving, and put together the "How-To" pages linked below. I found the process of removing the worn out paper cord from my chairs to be the most helpful thing for learning how the weaving was done, and pretty much learned the process by carefully dissecting the original wraps. If I have made any mistakes with the instructions, feel free to point them out.
http://www.thomaspenrose.com/diy_cord01.htm
Wow!
Great job! Your instructions are really clear and your photographs are excellent, very professional looking.
I learned one new thing---tacking the wrapping cord at the midpoint and working from the center to the side. I always start at the side and work my way over. I use shorter lengths because one long one is too hard to get between the front/back strands. I anchor the ends by twisting them together and then wrapping them. I don't think they'll ever come undone, and it looks fine once wrapped, but your way is better. I've undone chairs done your way and could never figure out what that center tack was for! Huh.
One thing I would add is to be careful during the wrapping step and the side-to-side weaving that you don't overlap a strand on the underside. I do this a lot and it's not hard to fix if you catch it soon enough, but once those cords are packed in tight, it's hard to wiggle that overlapped one back into line. I get into the habit of running my fingers along the undersides of the rails to check.
Oh, also--a plain table knife is good for pushing the cords over to keep them packed in tight. I do two or three at a time and I do it as I go so that I don't have to do a whole lot at the end. I always seem to have room for one more weave on the seat but no room on the rails for two more strands.
Last tip--a serrated steak knife cuts through the old woven seat faster than anything I've tried. Just saw it out. You can also cut through the wrapped cord easily without damage to the rails by holding the blade flat against the rail and sawing.
Your instructions make me wish I had a seat or two to weave! I love doing this kind of chair seat.
If you ever get into doing rush seats, please post about it. I have done the one on my Wegner J16 rocker five times and it still looks like crap. It's so much harder to do than the other type of weaving. I'm leaving it for now but someday I am gonna have a pro do it.
(This one is NOT my chair! I wish it was.)
how not to weave
In looking for the J16 pics on my computer, I came across these photos I saved of a Møller chair that I bought a few years ago. The weave looks interesting if a bit worn (and also it's seagrass, which isn't appropriate)---and then you turn it over!
I thought you might get a kick out of seeing it!
Thanks Spanky. Those were...
Thanks Spanky. Those were great suggestions, as I experienced exactly what you are talking about. I added notations about using a serrated knife to saw the cord, and also a caution about the need to check the bottom of the side rails to make sure the cord is not improperly overlapped.
http://www.thomaspenrose.com/diy_cord01.htm
Spanky
Did you ever find those pics of your J16? I've tried getting the stain out of my cord seat, but it's just not happening. I was thinking I may record the seat, but use black instead of natural.
The online tutorials I've found don't mention the poles wrapped laterally on the Wegner chair, before the actual weaving begins.
No pics, sorry
I couldn't figure out how those wraps were done either, so I just fiddled around until it looked ok. I wrapped them with separate lengths of cord---not part of the actual seat weaving. I tacked them with blued steel upholstery tacks, which you can get in any hardware store.
Do you have a source for black Danish paper cord? I've never seen any.
If you do decide to try weaving this seat, get the Caner's Handbook (sold by Frank's Cane & Rush supply--i think it has a longer name but I'm too lazy to go look it up). The weaving involves doing sort of a double figure 8 around each corner, working from the outside to the center. It's really, really easy to skip one part of the figure eights and end up going back the other way for a few turns before you realize it doesn't look quite right. And it can look deceptively right while being completely wrong! Very maddening.
The key seems to be to keep all of the strands perpendicular or parallel, as the case may be. This means turning 90 degree angles with the cord, not 91 or 92 or 93 degrees. This is easier if you give the cord a quick soak in warm water. I think it's only supposed to be maybe 20-30 seconds. Even with that, it's very hard on the hands. Plus on that big Wegner rocker seat I got bruises on the inside of my upper arms from constantly reaching across and under to grasp the end of the cord. It was a stretch.
Be sure you get the bigger diameter cord, too. Whatever is on there now. I gave up on that and used the narrower stuff because I thought it would be easier---and it was, a bit, but it doesn't look right. Wah.
Good luck and please post about your results! Maybe I'll get inspired to weave mine a sixth time. Or not.
I noticed
I noticed on some of the tutorials about chairs with a narrower back that they have you start weaving the outer corners first, until you are able to weave the center as a square. On the rocker the front spindle is wound until the seat becomes a square.
Some of the UK companies seem to have black cording. I'm not set on it, just seems like a nice departure. There is actually a caning shop very near my house that often does modern pieces... If I had a lick of spare time I'd sign up for a class.
Yes, but...
...if you just start winding the cord around the front rail until you reach a point even with the end of the back rail and then go from there, you end up with one strand at a different angle in front, destroying the clean lines of that perfect triangle of blank space. It's not that noticeable unless you're looking at the seat edge from a lower angle, like when you are sitting across from it. But the original weaving didn't have that stray strand and I couldn't leave it that way so I did a separate wrap of the rail and tacked the ends in place. I wish I'd paid more attention to how the original was done before I removed it, but I assumed it would be easy enough to do.
I tried weaving from the opposite direction, but then I got the stray strand on the other side. It dips because it's not being held in place by a wrap on the perpendicular. Or something....it's hard to remember now because it's been a couple of years, but I do know that I tried every which way I could think of and I finally gave up.
The other thing that I have yet to master is keeping the diagonals straight. Mine are better after five seats but they're still nowhere near as nice as the original. It's frustrating because I am quite proficient at every other kind of neat, exacting work that I do. I think this just takes a lot of practice.
J16 re-weaving paper cord seat
I've been searching and searching for some tutorial, instructions or diagrams on how to do the woven seat for the J16 Wegner rocker.
I have a lovely rocker that is midway through restoration and want to know how to weave the seat. I picked it up from the restorer today - the arm dowell was broken, it needed drilling out and replacing, other joints needed some strengthening but otherwise in good shape.
You may think this funny, but I live in Denmark and a Danish friend found a lovely man who restores Wegner chairs and can do the seat for me. I'd like to learn but a) don't speak Danish b) he is blind and does it by feel/touch (he has been doing it for years and years). One of the few craftsmen around.
I am moving to NZ in 4 weeks time, so need to get cracking, sanding and re-painting this week.
Any ideas?
Thanks


If you need any help, please contact us at – info@designaddict.com