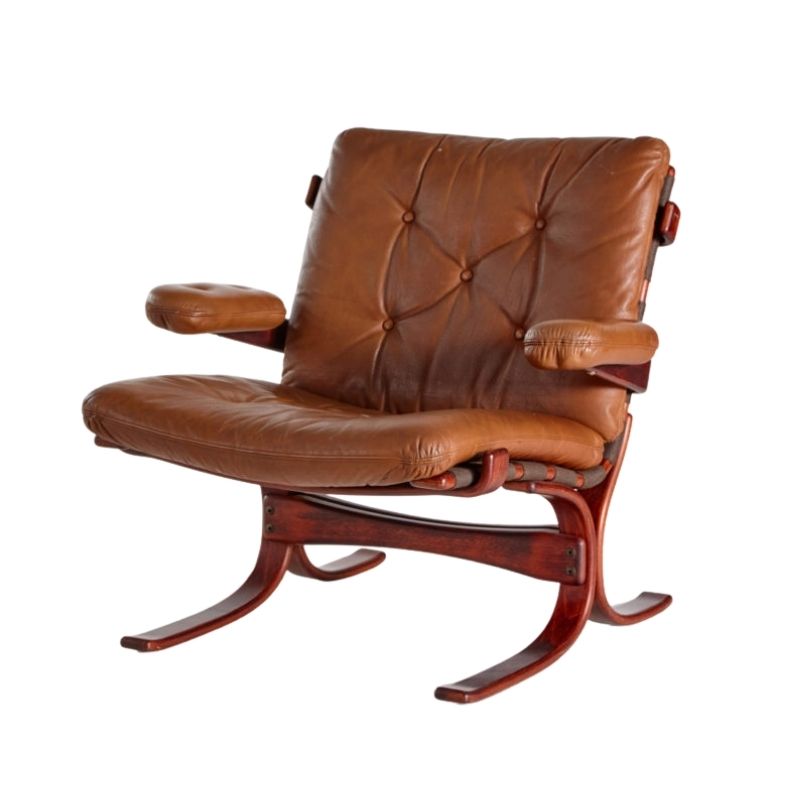
I picked up this chair. It looks like a Japanese ode to the Wegner JH-512 chair. It's cool, it's cumfy, but it needs some work.
I'm pretty sure it's twisted paper into a 3-ply cord. Over span of 10" I counted 88 wraps so pretty close to 7/32".
Rounding up in my calculations I figure I need close to 900 ft of the cord. (does that sound about right?)
Can someone tell me exactly what material I need to be asking for to re-wrap the chair. I'm in the USA. Any recommendations for source would be great to.
Thanks.
http://d1t1u890k7d3ys.cloudfront.net/cdn/farfuture/brz7ecLFtcmFOASRhxgKHUJ_bWgLAhhbsK1Z-hDcRuo/mtime:1487892851/sites/default/files/forum/7ys9.jp g" /><img class="wpforo-default-image-attachment wpforoimg" src=" http://old.designaddict.com/sites/default/f 
danish cord
is the name of what you are looking for. Link below to a supplier I've used.
It comes in 1/8 and 3/16 inch thickness. And laced or unlaced. I prefer 1/8 inch unlaced, but that is just me.
http://www.franksupply.com/caning/rush-and-supplies.html
Perfect! Thank you Leif. Just...
Perfect! Thank you Leif. Just one more question and I think I'm ready to order. The maker of this chair used flat head nails as seen in the photo below. Can I reuse the existing nails? Do I need the Danish L-shaped nails? What are the pros and cons of either choice. Not sure I like the idea of adding a bunch more nail holes if I can avoid it.
Those are just Cut Tacks,...
Those are just Cut Tacks, available at any home improvement store. They're wedge-shaped.
When you tack paper cord, be sure to go through one of the three strands. If you don't, you end up separating the strands and it won't hold as well.
While "The Caner's Handbook" by Miller & Widess doesn't cover this type of chair specifically, it's an excellent resource for the price and I'd strongly recommend picking it up if you plan to replace the cord on your chair yourself.
Also, there are several forum members who have a lot of experience with paper cord, and a couple of excellent threads that will provide additional info. I've linked to the first thread, which also has a link to the second thread at the bottom.
http://www.designaddict.com/design_addict/forums/index.cfm/fuseaction/th...
Those are furniture tacks
And the maker took a nasty shortcut there. That is probably why the seat is falling apart. Danish cord is quite strong under tension, but it doesn't wear well when repeatedly rubbed against something sharp, which is what happens every time you sit.
I have a Yugoslav "Wagner". Each couplet of warp cord goes around the rail and loops over itself. Sort of noose like. There is no nail to rub against.
And the L shape nails are not for this kind of seat. They are for a seat where the underside isn't expected to be folded up into plain view.
I would recommend looking at how it was done on a real Wegner too, as that would be the most "authentic" way. And that might be the same as my Yugoslav one, or maybe not.
I just learned something
It appears that Johannes Hansen used cane, never danish cord on the Wegners.
And the back is woven on both sides, not how my yugoslav one is done. Which is a much nicer way to do it although it takes more time.
And since spanky hasn't responded yet, I will offer you an article from her. The photos in here are a very good guide to how to re-cord it yugoslav style:
http://www.modernchairrestoration.com/2012/05/wegner-style-yugoslavian-f...

Tacks are needed on the Yugo folding chairs
to secure new lengths of cord. When you wrap around the side rails instead of hooking onto L-nails, you have to use cut lengths of cords for the weft. You can't just pull the cord off the spool as you go. I used 25- to 28-yard length which are doubled. You pull the entire length through each time.
The weft on the back on one of these chairs takes about 100 yards of cord, I think--anyway, at least three 25/28-yd lengths, maybe four, I forget. It is possible to use one very long length of cord, I guess, but you'd spend so much time pulling it through (and even more time untangling the inevitable messes) that it is not worth it. Believe me. Even thirty yards is a lot.
So. The trick is to anchor the ends of the previous length as neatly as possible while joining the new length at the same time. Tacks are fine to use. Pneumatic staples are good, too. Whatever can be done very neatly and discreetly. (I've seen originals with huge knots on the back. Yikes. Avoid that at all costs.)
Also, there are two ways to do the side rails--one is with an extra wrap around the entire rail and the other is with a loop around the double strand. Most of the original weaves on Yugo chairs that I've seen were done the second way. I prefer the look of the first way myself.
The backs on the genuine Wegner chairs are woven on both back and front and have an odd interruption in the weave pattern to one side one the back. There's also a slot in the top surface of the top rail with a few cords threaded through that. I'm not sure what the weave function is in these two features. I have seen the chair in person but have never undone one or rewoven one. Maybe someday.
Thanks all.
Good stuff! I appreciate the tips. Spanky, I saw the website that Leif linked to earlier today. Very nice. This is one of many projects. Step one is to gather materials and you all have certainly helped there. I may already have Miller & Widess' book, we have a few on camning and such. I know my wife was flipping through one the other day that covered these techniques. Soon I'll have to decide how I want it wrapped. Life would be simple, but boring, if there was only way to do anything. 🙂
One more post on this one...
One more post on this one for now. Now that I've looked at it in more detail I noticed the weft on the seat is done a little differently than I've seen in other versions of this chair. The weft cord on the seat appears to be a single long cord, but the way it's done makes it fairly easy to manage. See last picture on how they just run a cord through the loops so that it locks and won't pull back through the slot. Is that a good technique?
For reference, 3 pics below; Closeup of seat weft loops. (sorry that ones a little fuzzy); Seat from Bottom, Back from rear.
We haven't decided on a pattern yet but we have some time.

If you need any help, please contact us at – info@designaddict.com