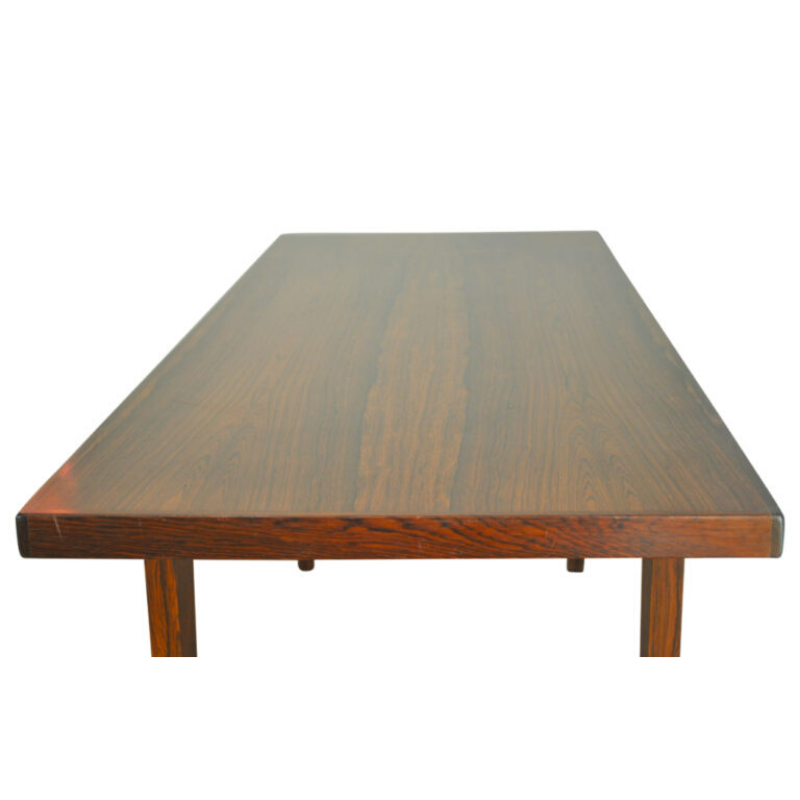
I bought some shelving from an estate sale. From searching this forum I believe they are HG70. They are marked H.G. Made in Denmark. I don't have experience putting up shelves.
The shelves and cabinets are 35" in width but my wall studs are 16" apart. Using every other stud would give me 32" spacing. I would be nervous they would be too heavy to hang on drywall.
I'd love to put these up. Anyone have experience installing these?

EZ Anchors (aka screw anchors)
I've hung all my shelving using this type of anchor in my drywall.
> accurately mark the wall where you intend to put screws
> aim a Phillips head screwdriver at mark
> tap the screwdriver head through the drywall with a hammer
> remove screwdriver from wall. Now there's a nice pilot hole. (Alternately, use a drill for pilot holes)
> tap the anchor's point into the hole with a hammer, until the threads just about meet the surface of drywall
> screw the anchor into the drywall using a Phillips head
> voila! Now you can screw the rails into each strategically placed anchor, the hell with studs.
I've hung four shelving units in this manner, they each hold hundreds of pounds of books & electronics, they've been installed for more than a decade.
The only thing you need to pay careful attention to is measuring & marking the screw holes accurately, and making sure that each rail is precisely level with the rest. I suggest that you make a diagram (with measurements) of where the screws should fall on the wall, before beginning.
EDIT: As SDR points out afterward, screw anchors need a specific size screw (--if memory serves, it's a #8 sheet metal screw). Ask your hardware guy about the screws, if you go this route.

Shouldn't we
add that the anchors are designed to accept one or two specific sizes of screws, and that only these will secure the load to the anchor ?
I'm glad to hear you've had success with these. I've used them too. I would expect them to do well with shear loads (i.e., straight down toward the floor). The further out from the wall is the load, the more that the upper fasteners are subjected to withdrawal as well as shear -- and there would be a limit on how much withdrawal force these fasteners could provide, it seems to me.
The poster appears to have an ideal situation for picking up at least two adjacent studs, leaving a good deal of leeway for placement horizontally. Four screws into two studs would be fine for handling these cabinets, assuming the backs are thick enough not to bend or pull through the screws. The screws would best be placed near the top and the bottom of the cabinet back; if there is a thicker hanging rail at the top (and bottom) those would be the intended place for fasteners. The attachment points could be quite asymmetrical (off-center horizontally) without raising a problem.
Threaded Drywall Toggles
"These are the "big brother" to the threaded drywall anchor. They combine the threaded anchor's ease of installation with some of the strength of a toggle."
Worked well for hanging my Cado unit.
http://www.naturalhandyman.com/iip/inffastener/infanchor/infanchor.html
Oolong
If you attach to one or more studs, the EZ anchors would be redundant. Screwing to studs is easier, faster, and more secure. The anchors must be installed by holding the cabinet in place, drilling a small hole through the cabinet into the sheetrock, removing the cabinet, drilling and installing the anchors, replacing the cabinet in the exact same place, and screwing small screws, perhaps with washers, through the cabinet and into the anchors.
EZ ?
Doesn't this system work by...
Doesn't this system work by mounting rails to the walls and then cabinets to the rails? If so, it's only necessary to hold the rail up to the wall, not the cabinet.
And even that isn't necessary. If Oolong lays out his cabinets and rails on a big sheet of paper and makes a template by tracing around the cabinets and marking the mounting points, he can locate all the screws at once simply by moving the paper around on the wall. That'll be much easier than moving cabinets, and it'll also save him from having to measure and place (then erase, and measure again, etc.) dozens of pencil marks.
I've heard tell of that tracing technique, Fastfwd--
It doesn't strike me as much of an effort-saver, though-- in addition to obtaining an enormous sheet of paper, wouldn't one have to also go through the motions of precisely configuring the pieces on the ground, making sure that they're in precise formation; then tracing without upsetting the pieces?
My method only requires that I mark the height properly for each rail, then mark each rail position the proper distance from the next. Then, I temporarily hang a rail in each spot with a single nail, hold a level alongside it to make sure it's perfectly vertical, then mark where the screws should go with an awl (or similarly pointy object).
SDR-- the EZ anchors wouldn't be redundant at all, they'd still be absolutely necessary for rails where there are no studs. Without anchors, the stud-less rails would pull out of the wall, no? The rails screwed to the studs would be rock solid, but the anchor-less rails would be a disaster, especially if they're "outside" rails.
Rockland-- I've never tried "threaded drywall toggles", EZ to use? After my few exasperating attempts to use its even bigger "brother", the toggle bolt, I'm gun-shy of anything with "toggle" in its name!
Yes, I was
ignoring the peculiarities of this system, and referring to ordinary cabinet boxes which can be fastened anywhere along their width.
So, what exactly does this system entail ? Do the vertical rails need to align with a particular point on the width of the boxes ? Do they coincide with the outside dimension ? Are there holes in the boxes at that point ? Does on use Euro-screws, or are there pins of some kind ?
.
We had this conversation not long ago hanging a Cado unit.
The fella eventually mentioned that he had lath/plaster walls.
So we went on and on about different solutions. (i think)
I recently hung three Cado units. One very large unit that we split up.
Liv room on redwood tongue and grove walls was a very easy install.
Bedroom unit is drywall, 1960's. Could not line up with studs so we used
the toggle i posted. (don't be scared WHC, : ))
The entry unit by the garage was no trouble using studs.
The most complicated about the whole process is deciding the layout.
I set a lower cabinet unit on an old Mccobb coffee table, leveled it.
Do not measure from the floor. Started the first two standards, (the skinny wall
brackets) all level. Started right and worked them left.
It took some time. Once the standards are up, the cabinets can be raised
or lowered. The shelves can be adjusted in endless configurations.
A very good level is your best friend in this type of install. Do not measure
from your floor. ; )
Enormous sheets of paper aren't hard to find.
You can get 500 square feet of (pink) paper, 36 inches wide by 167 feet long, at any hardware or lumber store for under $10.
W-H-C: It seems to me that what you're describing is harder than what I'm suggesting, which is simply this:
1. Paper on the freshly-swept floor. Stretch it taut and tape it down. Write "THIS SIDE OUT" somewhere on it, and draw a big arrow labeled "THIS END UP".
2. Rails on the paper, cabinets on the rails. Lay out ALL the cabinets and shelves (tape enormous sheets of paper together if necessary) and arrange them exactly as you like. Measure to make sure that they're square to each other, so when one is level they all will be. (Optional: Note with satisfaction that this is the only time you'll have to measure anything, and that you're doing it on the floor where gravity is your friend.)
3. Trace as sloppily as you like around the cabinets and shelves (this is only to help you visualize the items before they're actually up on the wall). Trace precisely along the top edge of one of the cabinets and label that line "LEVEL". Mark the position of each rail as precisely as you can with an "L" around each of its corners.
4. Check the rail markings, check them again, shrug, then remove the cabinets. For each rail: Make sure it's aligned with the marks you made in the previous step, then mark where the screws should go with an "X". Before you remove the rail, number and draw a small "UP" arrow on it (or on a piece of tape wrapped around it); note the rail's number next to its spot on the paper.
5. Paper against the wall, "THIS SIDE OUT" facing out and "THIS END UP" pointing up. Move it around until it's where you like, level the "LEVEL" line, then tape it in place.
Bam! All the mounting holes, for all the shelves and cabinets, are located. All variation in the rails and cases (warpage, wear, edge-to-first-hole distance in the rails, off-level mounting holes in the cases, repairs, hand-crafted "character", etc.) is accounted for. All pieces are level. If there's some reason that the cases couldn't be arranged the way you wanted, you'll have discovered that before you made one measurement or penciled one mark. If you want to get my opinon of the arrangement, you can invite me over and show me a life-size actual depiction of it on the actual wall. If I convince you to move everything six inches to the left, that takes only a minute and doesn't require patching any holes.
For just one cabinet, the two methods may be similarly time-consuming, but for multiple cabinets, tracing will be MUCH faster. Plus, tracing makes it easy to experiment and visualize, and it works equally well with perfect and imperfect parts.
The only downside that I can see is that tracing requires a flat, uncarpeted floor space large enough to contain all your cabinets.
http://www.google.com/search?q=red+rosin&tbm=shop
Sounds good.
You haven't described, however, how one makes sure all the cabinets on the floor are square to each other -- corresponding to "level and plumb" when hung on the wall -- unless I missed something. Could this be done on the wall, by making sure a row of holes in the standards aligns along a single (leveled) line ?
Fastfwd-
That seems unnecessarily complicated to me. If you hang the rails absolutely vertical, absolutely aligned with each another, then put screws in all the rail screw holes... the job is done.
I have encountered warpage in my rails, but have always been able to finesse them into a straightened position, since warpage is minimal. Why mount them in agreement with the warp? Make your rails to toe the line!
If I need to visualize the position on the wall, I do a sketch on graph paper-- a lot more efficient than doing a life sized tracing.
You're right Rockland, don't EVER make the mistake of measuring from the floor! I did that with my first installation, years ago. No floor's as "level" as a level-- especially if you live in a 19th century building.
It goes to
show that there's "more than one way to skin a cat."
Will someone fill me in on how this furniture system works ? Are there holes in the backs of the units, that correspond to the holes in the standards ? What sort of fasteners are used ? I assume that the standards must be mounted to exactly align with the cabinet holes . . .
Why are there so many holes in the standards ? They seem able to afford an almost ridiculous amount of flexibility !
Square
I guess there are a few ways. If you happen to have a carpenter's square and a chalk line, it's easy to put a bunch of parallel lines on the paper ahead of time, then align to them... But it's just as easy to freely arrange all the cabinets and then align them afterward, by constructing parallelograms:
1. Arbitrarily pick one cabinet and decide which of its edges you want to be level. Draw a line along that edge and use a chalk line or a straightedge to extend the line to the edges of the paper. That's your Baseline.
2. For each additional cabinet:
a. Decide which of its edges should be level. Measure from point A to point B along that edge. That's the Width.
b. Mark two points C and D anywhere on the Baseline, Width distance apart.
c. Adjust your cabinet until the A-to-C distance is equal to the B-to-D distance. Bam! The cabinet is parallel to the Baseline.
And note that you don't actually have to "measure" anything. You're only TRANSFERRING the Width distance from the cabinet to the Baseline, and COMPARING the AC and BD distances, so a string or a batten or a long strip of paper torn off your roll will do the job just as well as -- and faster than -- a measuring tape.

If you need any help, please contact us at – info@designaddict.com