Well, it is good you mentioned the wax, because that definitely needs to be removed prior to doing anything further. The wax is also the most probable reason the DO has not penetrated since application. Typically, you are going to have quite a mess if you try to sand wax off. Your paper will gum up in a minute or two, and you will have to continually change paper. You definitely need to use a solvent to remove recently applied wax. It does not matter if it is shellac, varnish, DO, pretty much noting is going to stick well to a waxed surface.
At this point, I would vote for a full re-strip with methylene chloride, and start over. I know that is probably not what you wanted to hear, but this is how a novice re-finisher gets better. I have screwed up a number of refinishing efforts, but I have gotten better with each screw up, so there is an upside.
If you want to try and proceed, you will have to remove the wax. Mineral Spirits, Tolulene, Naptha, all of these solvents will do the trick. You just need a scotchbrite pad or steel wool, and a good share of elbow grease. One way to tell if most of the wax is off, is to use Naptha. If you wipe Naptha on the surface and it does not flash-off (ie evaporate) right away, and lingers on the surface a bit, then there is still wax there.
Note, you will need several applications of solvent and probably need to go over the table surface several times, to get enough of the wax off, to continue with finishing. Also, use a respirator, fitted with the appropriate organic filter, or you are going to get really high through this whole process.
Wax, ugh. That explains a lot. I think that both Zephyr and Tktoo have more or less recommended stripping it and starting over. Do that. No soy/citrus strippers either. Methylene chloride goodness.
zephyr: can you explain the theory behind why wax over oil might be a good idea? Or at least some pros. You have had some very good explanations above so I am hoping for more. It's always seemed like a bad idea to me.
I am by no means a professional or expert on this topic, and can really only share my experience with, and research on, my past refinishing efforts ...... That being said, I am not sure I have a good answer for you on this one, as the cons seem to outweigh the pros, for me.
Adding wax to an oiled surface has the following pros in my mind, but these pros can be quite situational:
- wax will add a little more protection from liquids and impacts (oil's 2 biggest weaknesses)
- It is relatively easy to apply, and difficult to screw up.
- certain wax application methods can deepen the finish (add luster and depth), and aid in building or knocking down gloss. (I have gotten some amazing results with wax over top coats of shellac, that are almost holographic in depth)
- when there are concerns about minimizing the chemicals involved in finishing, a bees wax or canuba over a natural oil like mineral, BLO, or pure Tung oil, might be options to reduce the chemical load on the article and its users.
Cons of wax:
- It is a somewhat temporary measure, that must be re-applied and refreshed. Depending on use of the furniture, this may be quite often. A daily use table will actually lose wax pretty quick due to abrasion and being wiped down with mild detergents after use. So there is definitely an element of increased maintenance. In the worst of cases, maintenance can be a monthly endeavor.
- wax is the period at the end of the finishing sentence. Once it is down, the finishing process is pretty much complete and determined. It is exceedingly difficult to perform any further finishing techniques once it is there (although not impossible for experienced finishers). This fact diminishes one of the big pros of oil finishes; the ability to easily re-apply the oil during repairs and normal maintenance. Sure you can apply the oil without too many ill effects, but it just wont penetrate and do its job nearly as well.
- Once wax is applied, it can be difficult to remove. Yes it wears off, but it can get into the grain/contours of the wood, and be very persistent. Removal typically requires a fair amount of effort. (As an aside, this is also one of the reasons you don't want to use Pledge and other dust/polishing sprays on furniture. In these cases, it is typically Silicone that causes the issues, but same mechanism and issues).
At the end of the day, well informed finishing choices come down to balancing the pros and cons of each finish, and your skill level in applying these finishes. Finishes that are very easy to apply, often offer reduced protection, and increased maintenance. Finishes that require more advanced knowledge and techniques to apply, often offer more protection and decreased maintenance. Additionally, the end product clearly weighs heavy in this decision. Oils, waxes, soaps, etc. can produce beautiful, natural, 'close to the wood' results, and this is typically the desired state with wood-centric, Scandinavian and MCM pieces. While some of the more protective polyurethanes, lacquers, alkyds, etc. can get a plastic-feeling to them pretty quickly. It just needs to be understood that this is all a trade off.
For me personally, I consider the piece's use condition(s), and try to split the difference between finishes as best as I can. A table, desk, or other flat piece that will get a lot of use, is most often finished with Shellac seal coat(s), multiple oil coats (whether that is natural, or a blend like DO), and then a few coats of high quality wiping varnish (enough to even the surface and sheen, but never so much that there is visible film-build or the natural releif of the grain is obscured). This finishing regimen is pretty straight forward overall, and not overly difficult to execute. But, there are all sorts of intricacies and dependencies that affect the final results: original surface preparation, varied viscosity of the finishes, temperature and humidity, application techniques (brush, pad, spray, etc.), curing/drying times, when to sand and with what (varying grits, paper, steel wool, abrasive pads), when to polish, tinting the finishes, and on, and on.
It is important that people realize that finishing is an art. Just about anyone can take it on, and do reasonably well, but it does take a lot of practice and experience to command it, and produce masterpieces.
Thank you for that explanation. That confirms my fairly educuted prejudice against wax finishes especially over oil. I thought I might be missing something.
I guess that something could be an amazing almost holographic finish on something like a decorative bowl that never gets touched. This is something to keep in mind.
Thanks everyone for the feedback on this. I had hoped to get moving on this quicker but time hasn't allowed.
I did take some time to strip off the wax and got some new photos of the table top to share because the affected areas are much easier to see now than they were with a fresh finish.
I hope next to try Zephyrs recommendation of a wiping varnish to even out the sheen and hopefully the color.
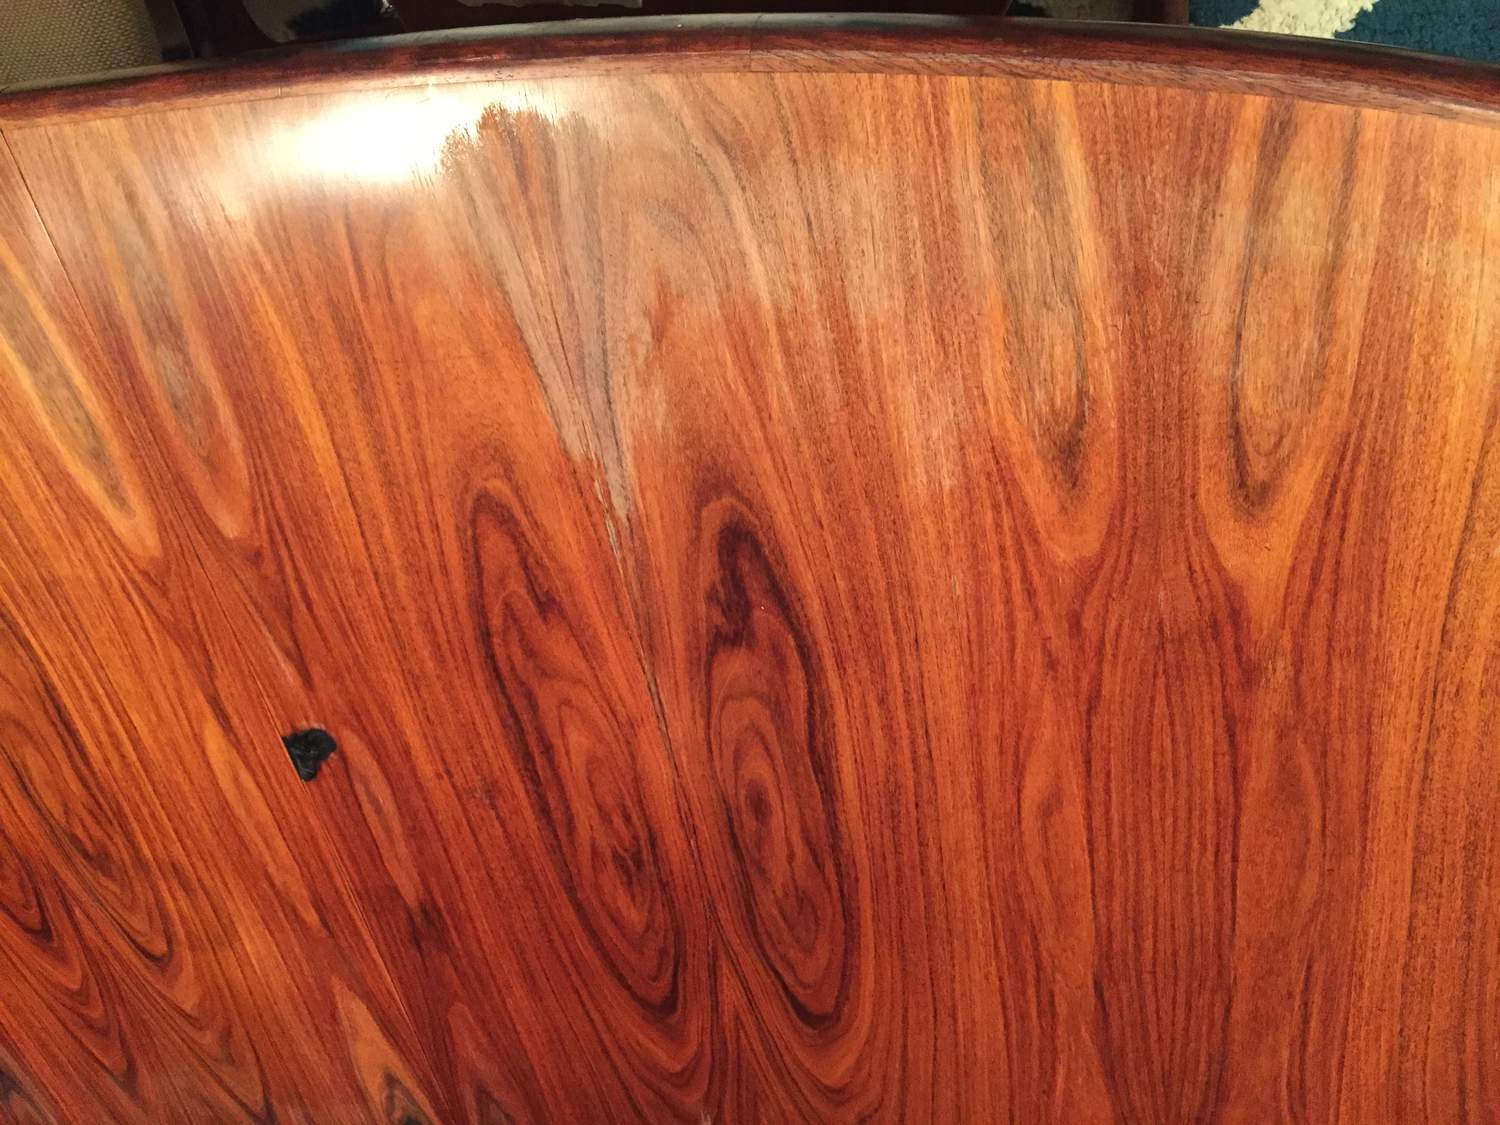
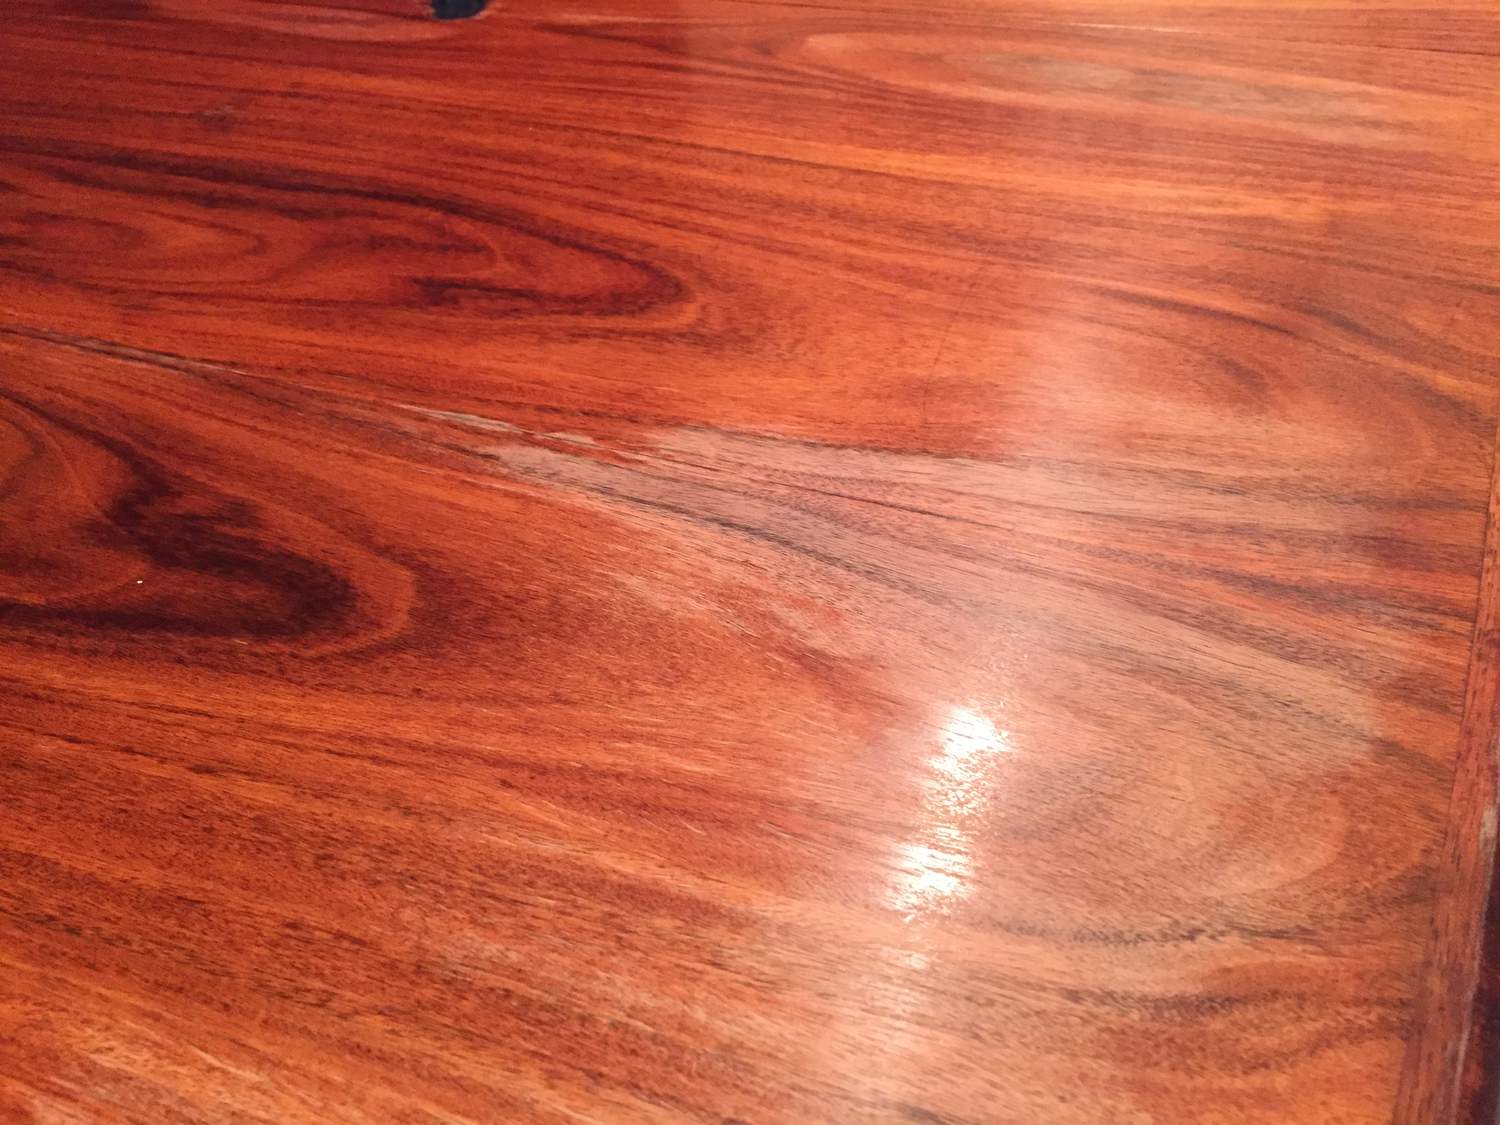
Well, that looks to me like water has lifted a film finish. (The finish is suppose the adhere to the wood, and reflect the wood right back out, but when water damages the finish, it can lift off the wood, and reflects the bottom of the finish.)
You still need to remove all the old finish everywhere, and then re-apply the oil.
Yeah, as I suspected, I don't think you got all of the original finish off. As others have stated, these areas were probably damaged by water, heat, cleaning solvents, or just plain heavy use. The original film finish lifted, or was thin, and when you sanded, you just removed the original film finish in these areas. The original finish is probably lacquer or maybe some sort of varnish (they stopped using shellac early in the 20th century as the primary finish, from what I have read). It really should all be stripped off, and start from bare wood.
You could try to using a wiping varnish without taking the original finish off, but I wouldn't even bother if it were my project, the likely hood of success is low.
Use methylene chloride to take all the film finish off, sand with 220 until the surface has an even smoothness and sheen, and then add the finish of your choice. Going from bare wood, you will have a much higher success-rate getting an even finish (provided you apply it correctly). Also, starting from bare wood you can do whatever you like for the finish. I have stated my preferences for finishing this table ad nauseum above, but you could just do repeated oil applications, as you originally set out to do. Lots of choices...
Thanks for the feedback. Sounds like I'll be stripping and starting over.
I see a few recommendations for methylene chloride above but notice the warnings about it online are pretty fierce. I will likely have to do the work in our living/dining room with some (but not great) ventilation. Any tips for doing it safely, or recommendations for less dangerous strippers?
Once stripped, I gather from above I should
1. Start with Zinzzer shellac
2. Re-oil with DO
3. Finish with a wiping varnish
4. Throw away the paste wax
Thanks all for the great feedback on this. I hope it helps other novices recognize and avoid similar mistakes!
You should be able to strip it with one of the citrus/soy/whatever strippers. It is not that they do not work. You should just expect more time stripping. Possibly two to three times more. Methylene chloride is not to be messed around with lightly. It gives a fierce chemical burn in seconds.
Oh and I know plenty of people have directly oiled old rosewood without problems, but applying de-waxed shellac first is really the better way to do it, and in my opinion gets you a finer finish. You will probably discover that your shellac technique is just as bad as mine, and you get shellac streaks everywhere. Fortunately you can remove them with 0000 steel wool. You might find that a harsh sideways light helps you see them.
Yeah, Methylene Chloride is pretty nasty stuff. Maybe if you were near a large window, and put a box fan in the window, blowing out, you could pull it off. But I would also recommend putting a drop cloth down on your floor, and using a organic respirator (something like the attached is only like 20 USD). Wear gloves as it will burn your skin. gloves should be the heavy yellow kind, not the thinner nitrile, and such that you get at the Dr. office. Only put the MC in a glass container, it will melt many of the common plastic containers. Methylene chloride with do the best job with the least elbow grease from your side. This being said, I would understand if you don't want to mess with this. There are citrus strippers that will supposedly do the job. I tried one once and it took so much time and effort to use, I vowed never to mess with one of those again. But if you are stuck inside, you gotta go with what you can do. I don't have any good recommendations for one, but a quick search online will get you in the right ball park. You will be fine. Just go slow, be methodical, and don't settle for 'good enough.' If you don't do a good job stripping and sanding, the flaws continue to show through the rest of the finishing steps. Realize the Shellac Seal Coat (Zinsser), will raise the grain a little one applied, make sure you sand everything again with 320 or 400, prior to moving on to the oil. I like foam brushes for shellac application in most cases. Shellac can dry as you put it on in warm really dry conditions, so move quickly if this is the environment you are in. cold and especially humidity can slow this down substantially, so if this is the case give it plenty of time to dry. Sand with a sanding block to get the most uniform surface. If the shellac is not dry all the way, or you use too much pressure, your sand paper will gum up. You dont want this, let it dry more, or use less pressure. You can almost never do too many coats of oil, just make sure you wipe it down good between coats, and make sure it is not gummy or sticky before applying the next coat. I have heard people say one coat of oil a day for a week, one coat of oil a week for a month and then one coat of oil per month for a year, and once a year after that to really create a solid oil finish. Too long for my short attention span, so I usually do the following ... First coat of oil, flood it on. The surface should be very wet looking. keep the surface good and wet looking for about 30 min, then wipe all the oil off and let dry for 12-24 hours. You dont need to sand between coats of oil, typically. By the second or third oil application, flood the surface, and then go over it with 0000 or 000 steel wool. Short strokes, with the grain. Do this the same as the first oil application (keep very wet), but do the steel wool for a good 15-30 mins, trying to evenly cover the whole surface with the short strokes. This creates and oil-rosewood slurry. After 30 mins of rubbing, wipe all the oil off across the grain. This slurry with help fill and even the pores in the grain, and give you a baby's butt smooth surface. You could repeat this again, or just oil again. I do 5 coats minimum. Do what looks best ( at this point you should be noticing the results from each application). You could stop here if you wanted. Before going to a wiping varnish, let everything dry for at least 3-4 days, and a week is even better. The varnish can be like shellac, curing fast in warm dry conditions, or taking a while in cool humid. It wont raise the grain, but you need to sand between coats, to promote a good mechanical bond between coats, and because you will get dust nibs, bugs, whatever in the finish. you can use a cotton t-shirt piece to apply, or a sponge brush. I reccomend the sponge brush, as it seems a little easier to get, than the technique with the t-shirt scrap. 3-4 coats of varnish will usually do it, but again you should be able to see when it meets your standards. Also note, Shellac uses Denatured Alcohol as the solvent, therefor this is what you would use to clean it up if you spill. Varnish and DO use mineral spirits as the solvent, so this is what you clean spills or brushes with for that. It all seems like a long process, but other than the initial stripping and sanding, it is usually no more than an hour for each finish step after. Good luck!
Its been a while since following up here. To update all who have been so helpful:
I decided to start by trying the Arm R Seal wiping varnish method to even out the finish. This unfortunately turned into a battle fighting streaks and bubbles where each application looked like crap and I had to sand it off and try again... Eventually I gave up.
A couple days ago I went ahead and stripped it using CitriStrip. The finish seemed to come off very well with a couple rounds. I stripped, scrubbed, then ended with a mineral spirits wipe down. This left the wood in great shape!
Tonight I started back with the first round of DO to bring it back to life and it seems to be taking pretty well.
I do want to put some sort of semi-gloss top coat on it since the base has a good shine to it, and it's a table top that endures two little boys on a daily basis. I still have enough ArmRSeal to finish it that way, but am afraid of enduring the application battle I fought before. Any recommendations for easy(er) top coat?
Also, the main table has faded from UV (towards yellow) compared to the leaves, which are still closer to a reddish color. I thought about trying to work some Red Mahogany tinted DO into the process to pull it back to a rosewood color. Any thoughts?
Below are shots during and after stripping.


If you need any help, please contact us at – info@designaddict.com