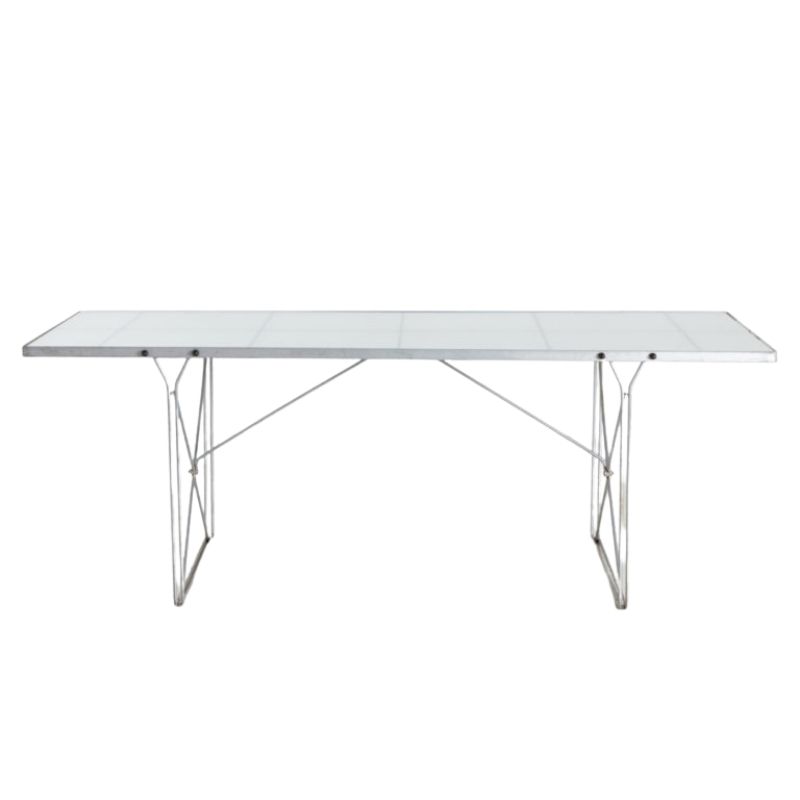
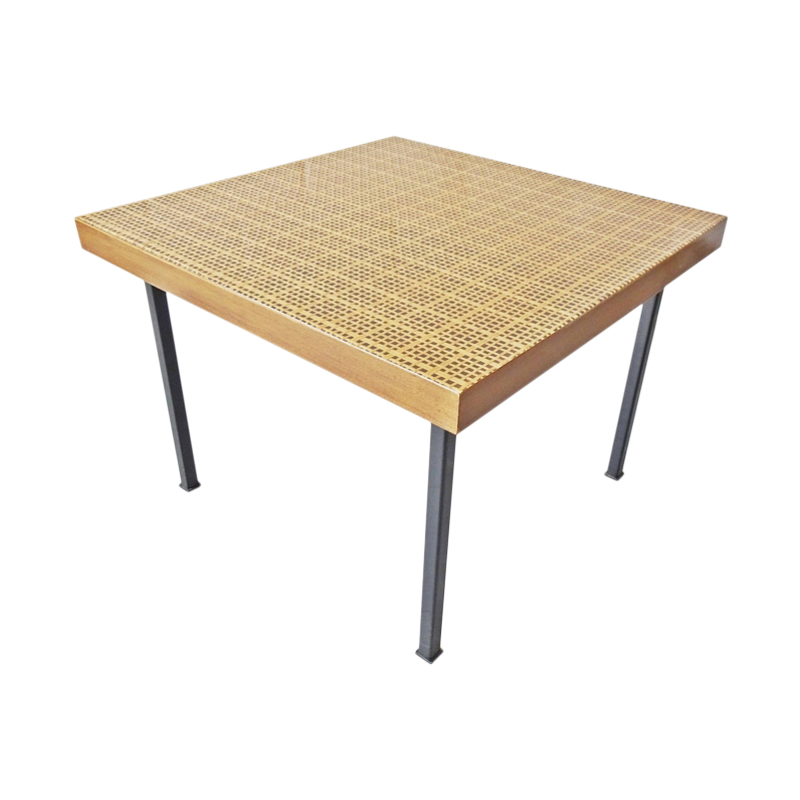
I picked up this table today primarily because it was packaged with a set of four old Moller 75s. At a initial glance, it appears to be one of the many generic draw-leaf table designs that have come out of Denmark. However, upon closer inspection, there were a few atypical details that make this table different from the typical generic design. So I thought I'd post it here to see if anyone has come across this design. The atypical details are:1. Large table size: the main table top is 60.5"x41.5" (154x106cm), 108" when extended, which makes this larger than most Danish tables, especially the width.2. Profiled legs: square cross section with chamfered inside corner at top, which then tapers down to a circle cross section at the bottom. Most generic tables have the cheaper round or square with no taper.3. Exposed splice joint at bullnose edge at the middle trim between the leaves when stored (the splice detail might be common but hidden on most tables)4. The top of each leg has impressed numbers (1-4) which are matched with the same impressed number at the rail corners. Besides some pencil markings, the impressed numbers are the only manufacturing marks on the table. The impressed font reminded me of those used by Carl Hansen, and I think JL Moller as well. Most generic table marks I've seen are ink or labels, not impressed.5. Fabric "pad" between leg and table top: there are what appear to be original squares of fabric fastened to the underside of the tabletop where the legs would meet the table. They are thin, and the only reason I can think of why they are there is to prevent wood on wood squeaking (which I know sounds weird and more appropriate for metal-metal or glass-glass contact).6. History: the seller said he acquired the whole Danish collection from the estate of a lady who brought it back with her from Europe. The Moller chairs appear to be quite old, with the foam above the jute webbing almost fully disintegrated (did original Mollers ever use jute webbing?). I haven't yet set the table up, so unfortunately the photos are all of pieces of the table. I was hoping that someone might recognize some details. I did check into old Moller tables, but while there are some similarities to Models 9 and 12, they are not a match to mine. Thanks. <img class="wpforo-default-image-attac
I just cleaned up and assembled the dining table yesterday, and thought I'd write a tangent post about something I learned.
While everyone has their preferred reconditioning process for wood furniture, I have always been very satisfied with the results from the Howard's 1-2 punch of 1) Restore-a-Finish for cleaning/rejuvenating an existing finish, then 2) Feed-n-Wax for applying an oil/wax polish that conditions the wood for future use. This post is not intended to debate the "best" process for wood reconditioning, but rather expand on what RAF is able to do for those who already use it.
Until yesterday, I almost always had done just one pass of RAF on teak , applied via 0000 steel wool, which did a good job of 1) removing grime, 2) eliminating scratches/marks, and 3) rejuvenating a worn looking finish. If there were isolated dark spots or water marks, I might rub the steel wool a little harder and longer to remove them, but always carefully as to not wear through a darker patina.
However, this dining table top had a strange un-symmetrical fading/wear pattern, where the contrast between darker teak and lighter worn spots was quite distracting. The initial pass provided some improvement, but not enough to have me consider trying out either a evening-out stain or a complete sand-and-refinish (both of which I try to avoid if possible). I did notice that the worn out lighter areas seemed to dry up almost immediately after rubbing, whereas the darker teak areas remained wet until I would wipe off with a cloth.
So I decided to do a combination of 1) heavier rubbing/scrubbing on the darker areas with the steel wool, which lightened them up a bit, and 2) more light rubbing with heavy RAF application on the worn lighter areas, which resulted in these areas darkening up as the wood absorbed more RAF. It was a bit weird for me to use the same product and application implement, but with different application techniques, to achieve opposite results.
In the end, I was surprised how much the table top evened out. It is not perfect, but very acceptable. I may even try another round this week to see if I can improve the appearance even more.
Anyway, I thought I'd share this story for those of you who use RAF. I'm posting a couple of photos, but unfortunately did not do a before shot. This table is quite large by Danish standards with the leaves pulled out. Also, the function of the fabric pads in #5 in the original post became obvious after putting the table together: they help avoid scratching the draw-leaves when pulling them out.

Oh, I forgot to mention that I almost always use only the Neutral RAF, which is basically a clear solvent, versus the numerous wood stain colors that they offer. Therefore the darkening of the worn areas was not from stain, but from the dry wood becoming saturated with RAF. I must admit that I just tried this yesterday, so am not aware of the permanence of the results.


If you need any help, please contact us at – info@designaddict.com